Bot Builder
The botbuilder section of this documentation suite outlines processes related to the creation, training, deployment, and versioning of your virtual assistant.
Create Virtual Assistant
Once you have successfully logged in to the Bua site and selected your organisation, you can begin creating your chatbot.
Only users with admin and botbuilder permissions are able to create bots on this platform.
Use the following steps to create your virtual assistant.
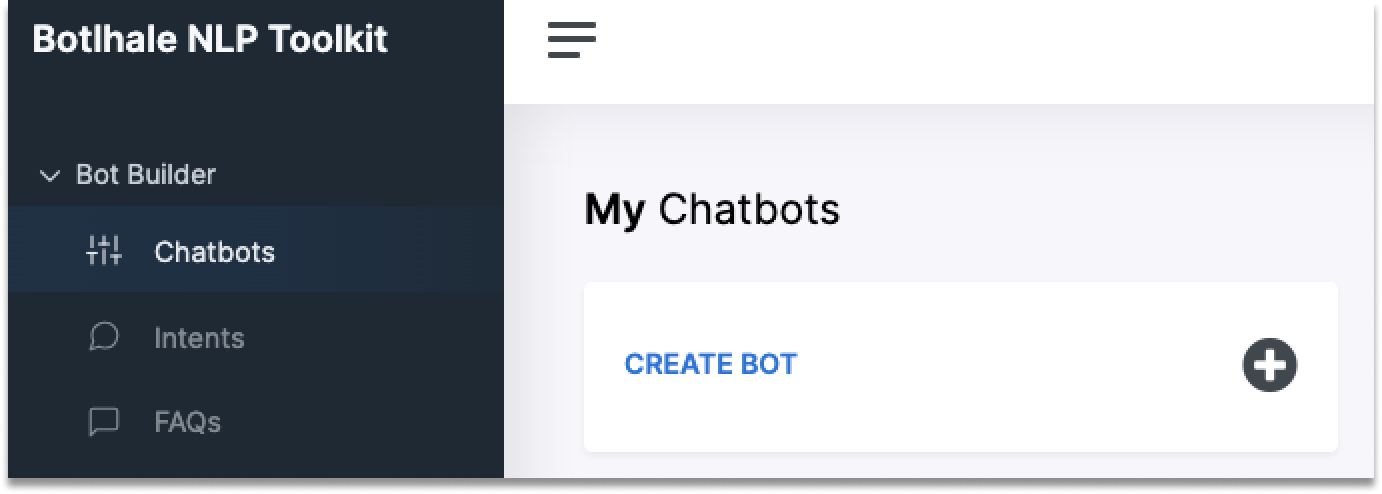
- Click on the
CREATE BOTbutton as shown in the following image.
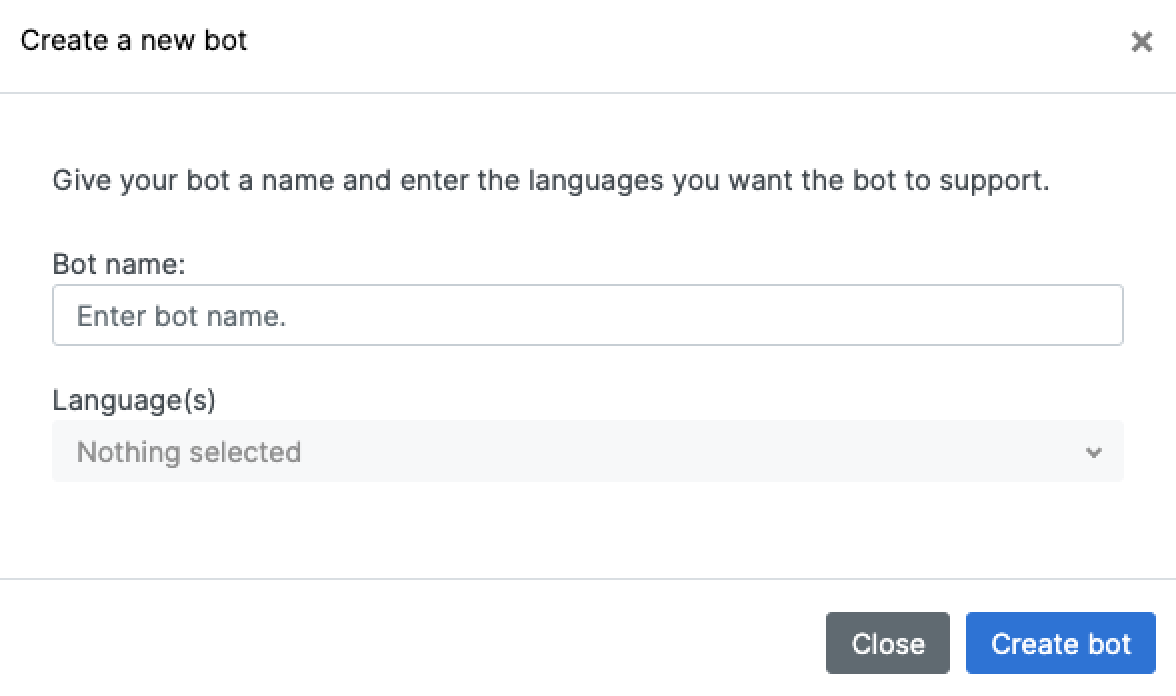
- A pop-up window appears, prompting you to name your new bot and select one or more languages the bot will support. Fill in the required fields and click
CREATE BOT.
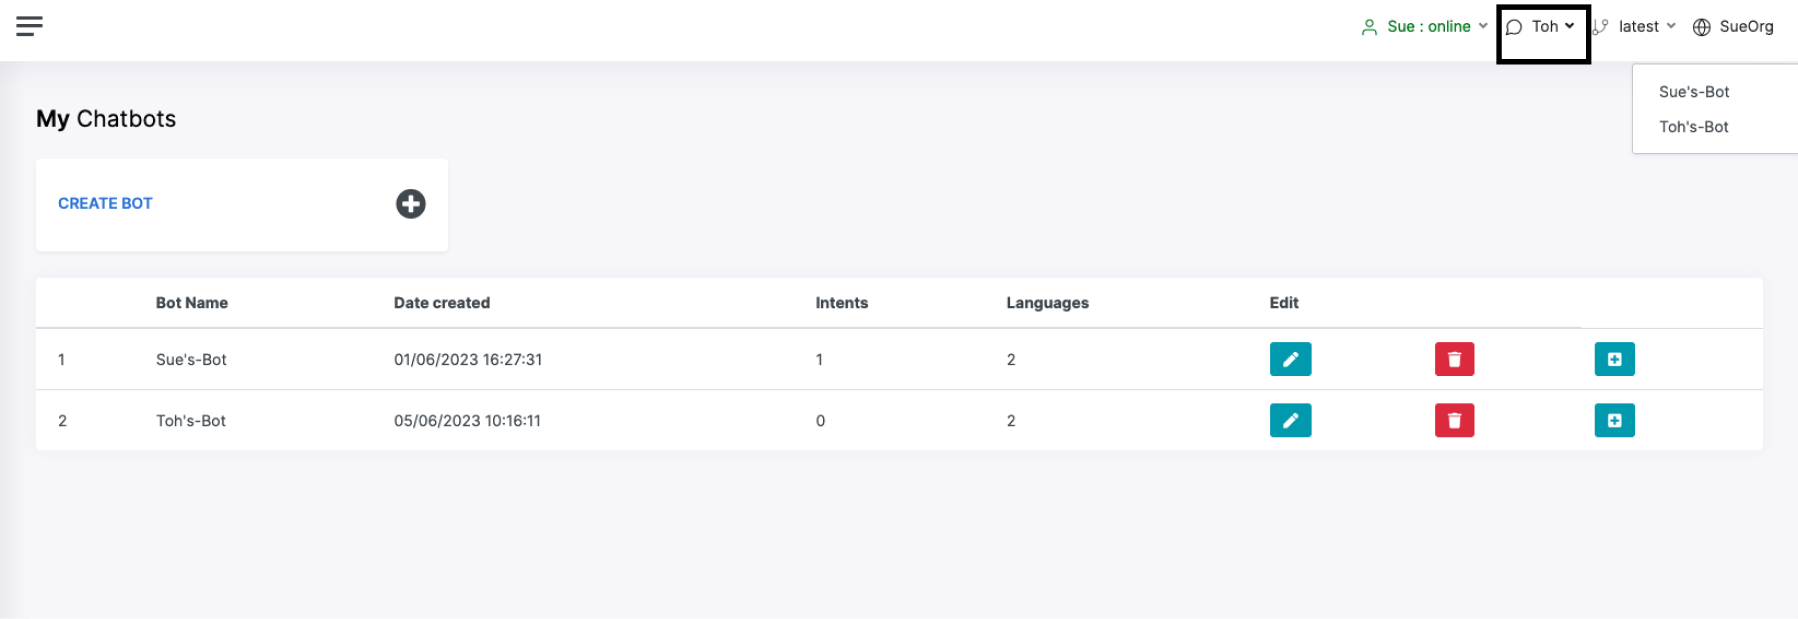
- The newly created bot is added to the My Chatbots list on the dashboard. You can toggle between different bots by clicking the Chatbot dropdown menu in the top right-hand corner of the page as seen in the bordered portion of the following image.
- Once the bot has been created, click on the
Editicon to add the Bot builder parameters such as Intents, Entities, and Dialogue. These are discussed in detail in the sections that follow.
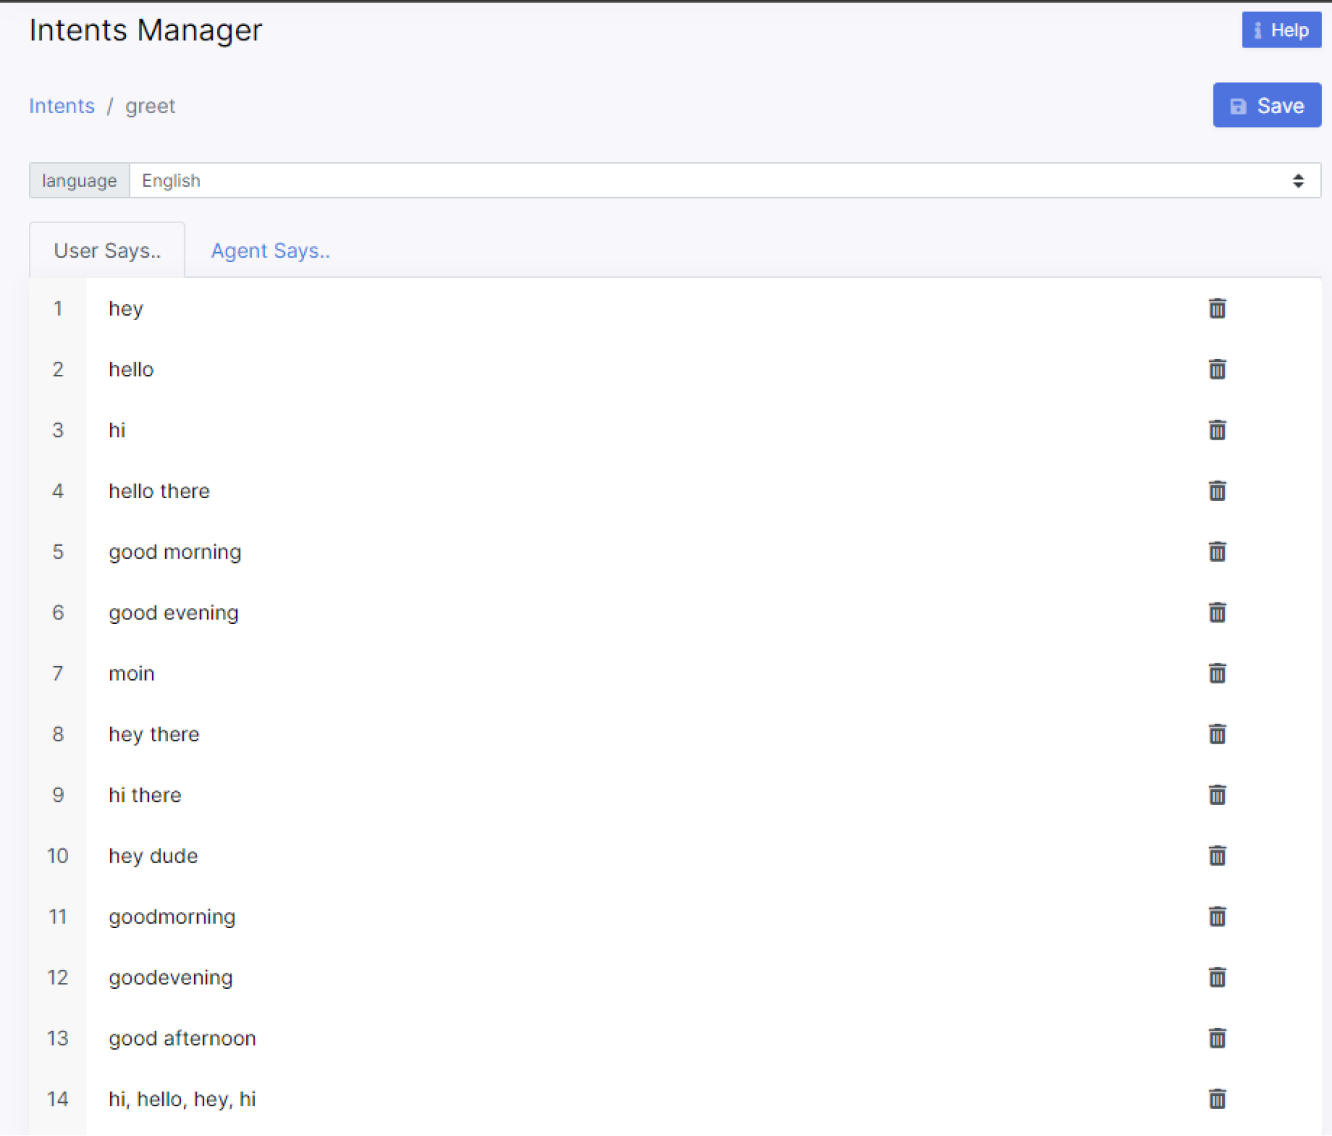
Manage Intents
An intent is all about the motive of a given chatbot user. It’s the goal behind each message the chatbot receives from the user. Intents categorise text based on the goal or purpose expressed in the user’s message. For example, the intent "greetings" enables your bot to understand when the user says "Hi". This creates a simple question-answer dialogue that provides a response to messages categorised to a specific intent.
Add Intents
Use the following steps to add intents to your selected chatbot.
-
From the My Chatbots page, click on the
Editicon of the chatbot you wish to add intents to. You are directed to the Intents Manager page. -
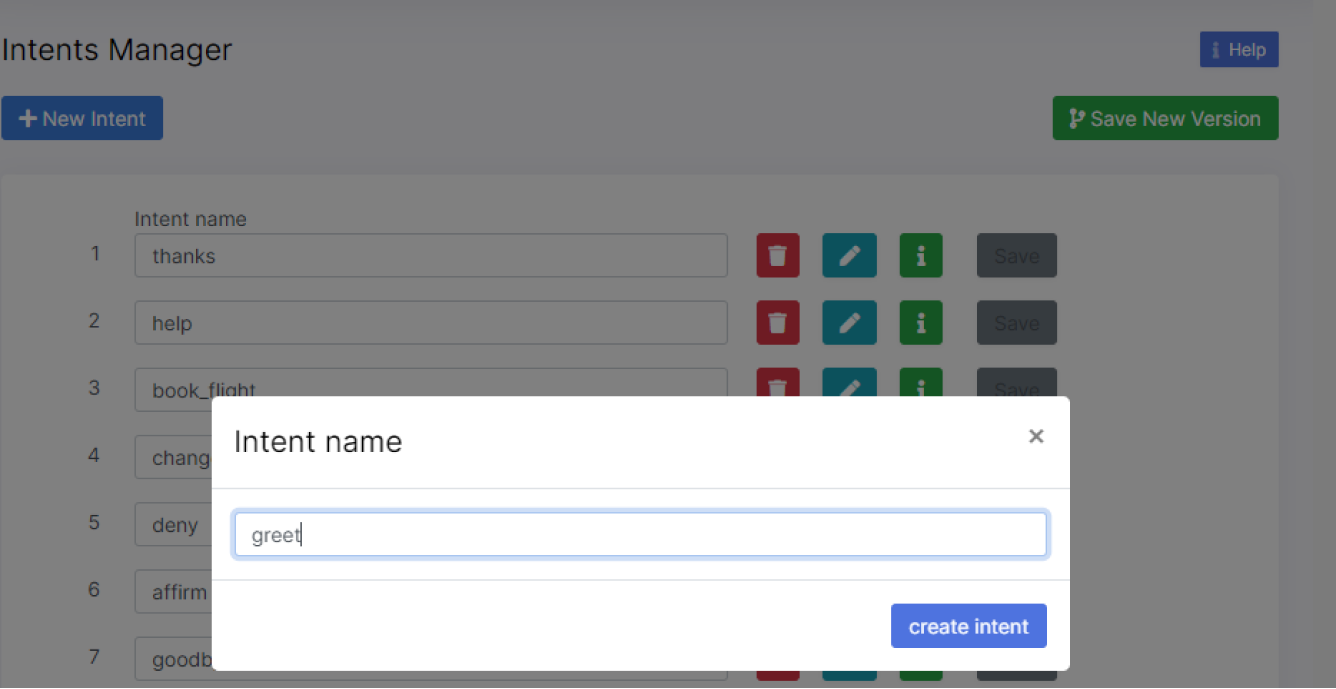
Click the
New Intentbutton. -
A pop-up window appears, prompting you to enter an intent name. Fill in the required field, and click
Create Intent.
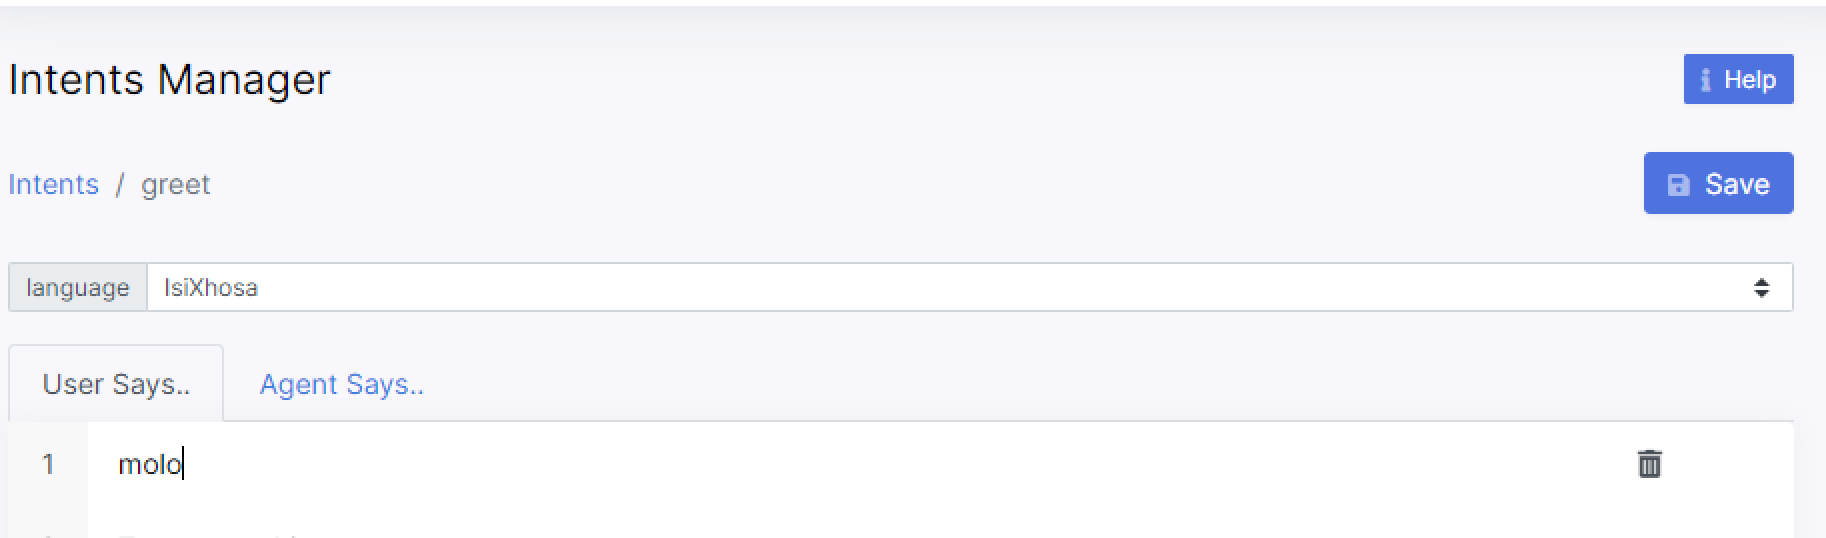
You need to provide example messages and responses for each language you selected when creating your chatbot. This is because on the backend, an intent classifier is trained for each language. A pre-trained language model for each intent classifier is used to create embeddings for the classifier to train accurately with fewer example messages. To toggle between predefined languages, select the desired language from the drop-down list of the language tab.
- Once you have provided a list of example messages and possible responses in your various predefined languages, click the
Savebutton to save the created intents of your bot.
Upload Intents
You can upload intents to the Intents Manager page as a CSV.
- From the Intents Manager page, click
Upload Intents - Specify the language of the intents.
- Select the intents file you wish to upload. Ensure the file is formatted correctly by referencing the example file.
- Click
Upload. - Your new intents are uploaded and appear on the Intents Manager page.
Generate Intent Examples
Once an intent is created, you have the option of automatically generating examples of user messages that trigger this intent. Use the following steps to do so:
- From the Intents Manager page, click on the
Viewicon next to the intent for which you wish to generate examples. - In the new page you are taken to, click on the
Generatebutton. - In the pop-up window that appears, enter an example sentence and specify the number of sentences you would like generated.
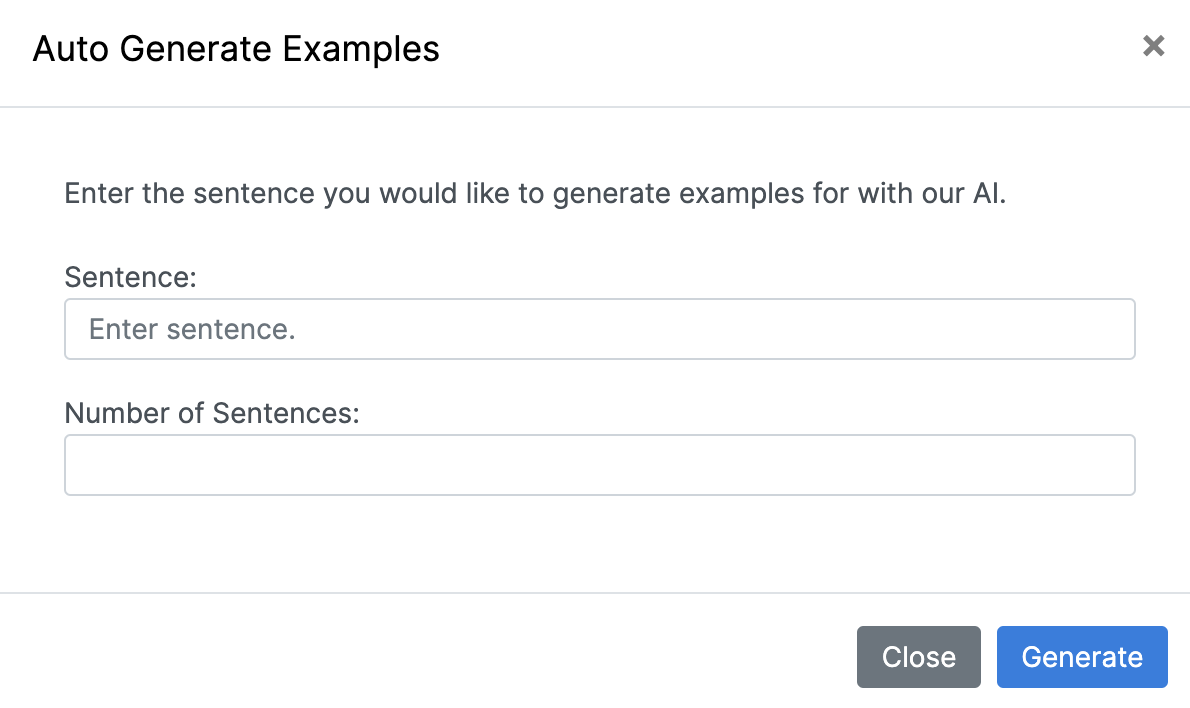
- Click
Generate. - Your newly generated intent examples appear under the User Says tab.
You also have the option of auto-generating translations for your intents. To do so, simply click the Translate button and select your target language. The auto-generated translations appear in the tab corresponding to your target language. This generated translation is fully editable.
Delete Intents
You can delete an intent from the Intents Manager page. Before you delete an intent, ensure it is not in use in the Dialogue Manager. If the intent you wish to delete is in use, you must first delete the dialogue using the intent before you can delete the intent.
Use the following steps to delete an intent.
-
From the Intents Manager page, click on the
Deleteicon corresponding to the intent you wish to remove. -
A pop-up window appears, prompting you to confirm this action by clicking the
Delete Intentbutton.
Deleting an intent permanently deletes any example values associated with that intent. This cannot be restored.
Only users with admin and botbuilder permissions are able to create bots on this platform.
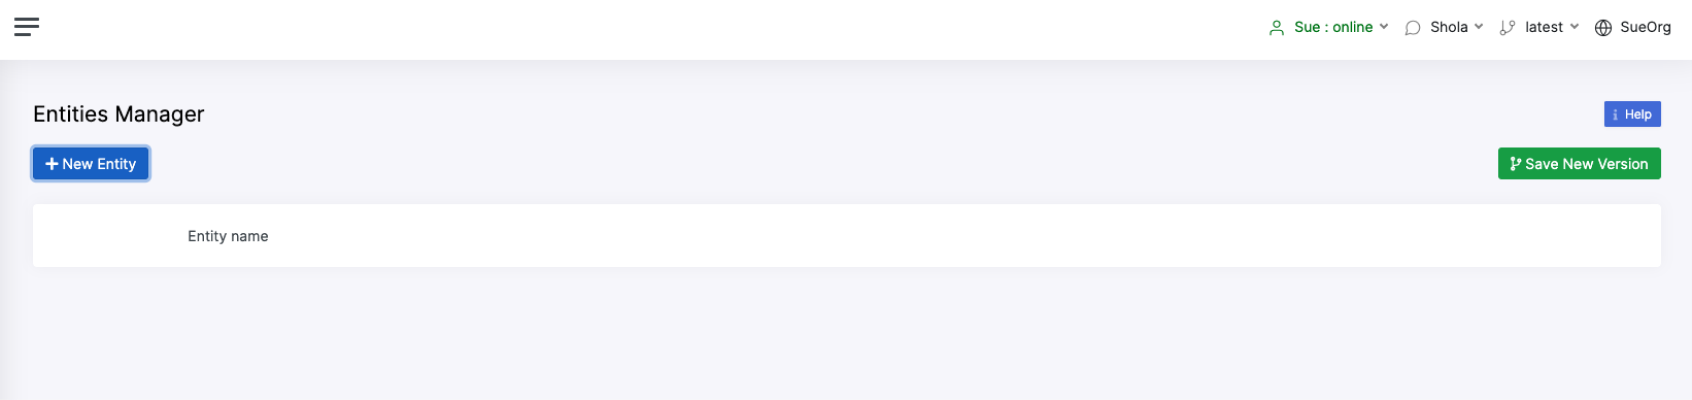
Manage Entities
Entities are words or phrases that are relevant for a particular conversation. They can be names of people, organizations, cities, products, brands, and so on. These entities are usually extracted from the sentence to use later on for an API-call, product recommendation, or to redirect a message to the right flow.
Create Entities
Use the following steps to create a custom entity.
Only users with admin and botbuilder permissions are able to create bots on this platform.
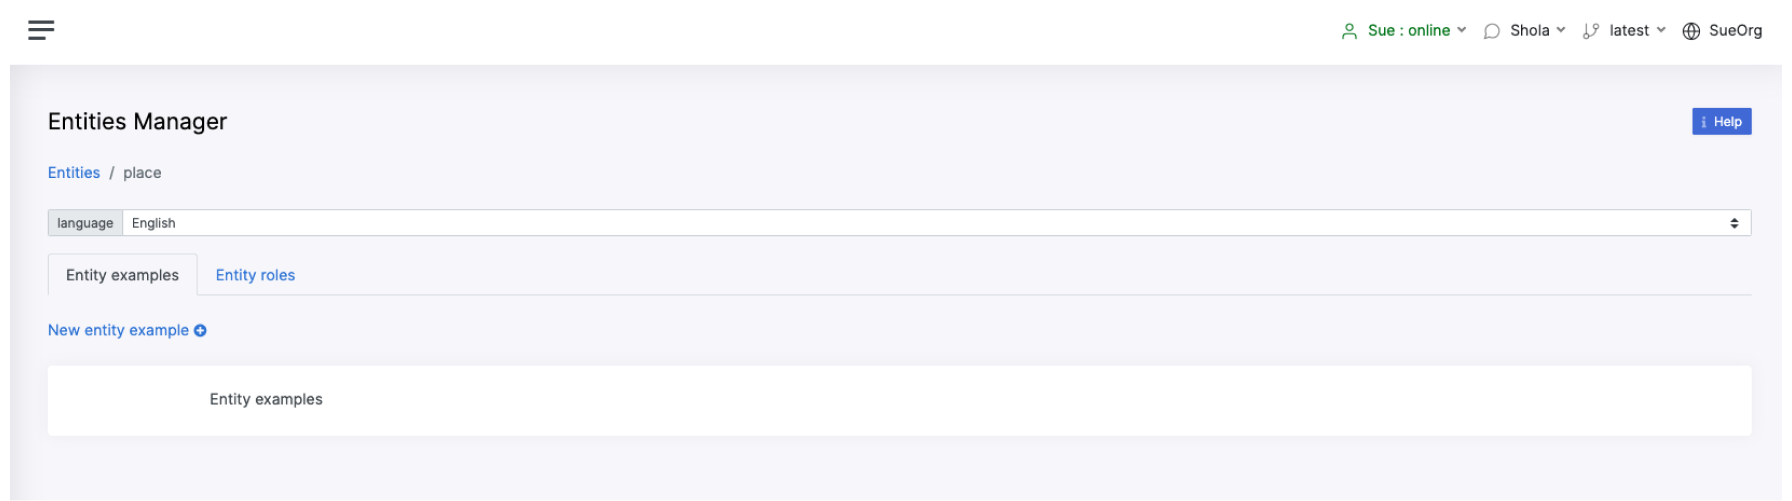
- From the Entities Manager page, click on the
New Entitybutton.
- A pop-up window appears prompting you to select the entity type and name your new entity.

-
Fill in the required fields and click the
Create Entitybutton. Your new entity appears on the Entities Manager page upon creation. -
Click the
Editicon next to your newly created entity. You are directed to a page where you can add entity examples and roles.
-
To add an entity example, ensure the Entity examples tab is selected and click the
New entity examplebutton. -
A pop-up window appears, prompting you to enter an example for your entity.
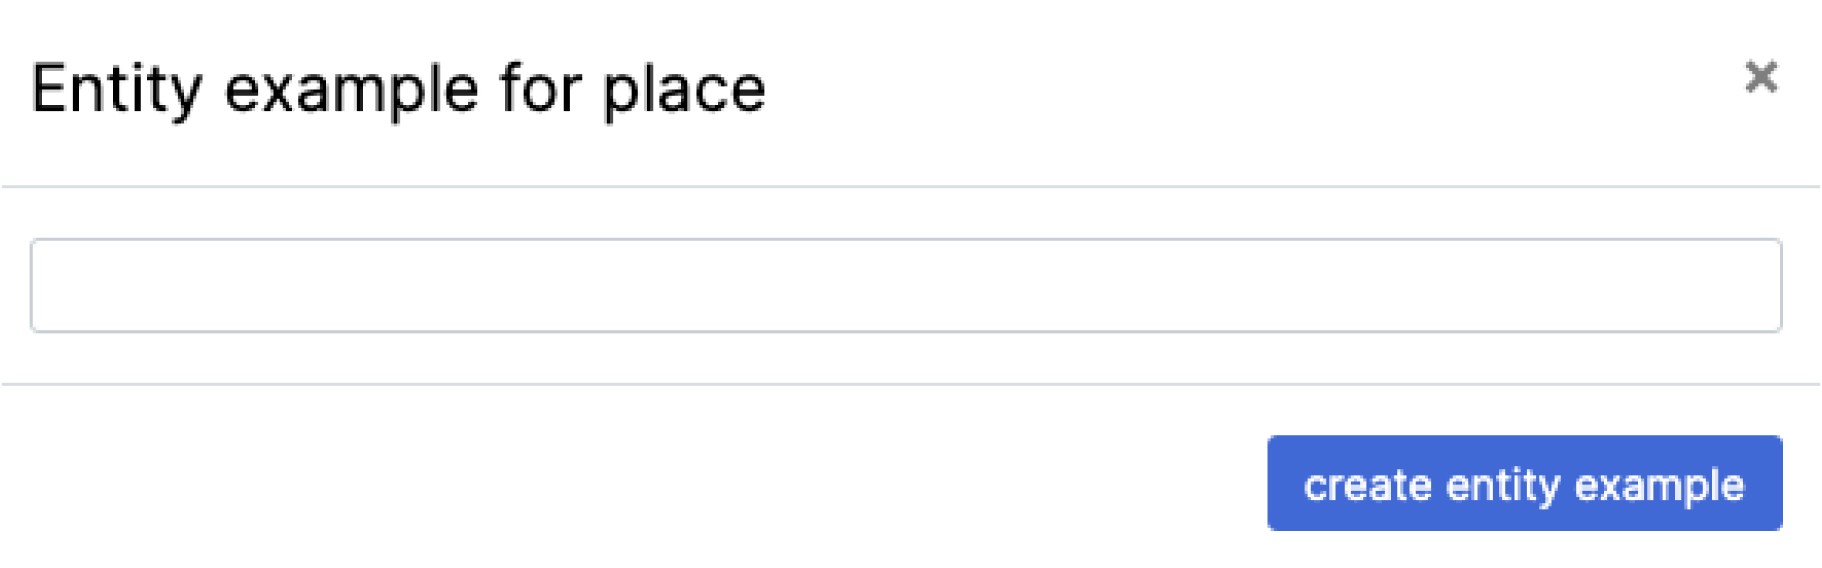
-
Fill in the required information and click
Create entity example. -
You entity example is created. You can add synonyms by clicking the
Editicon next to the newly created entity.
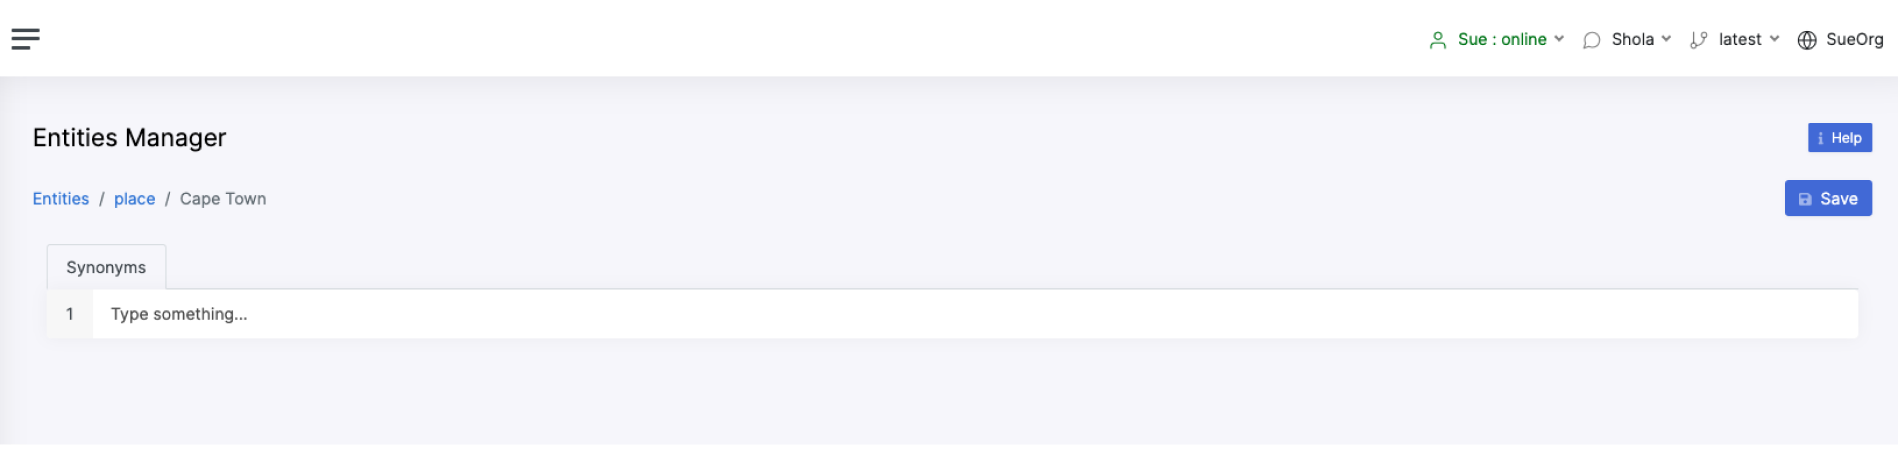
- Add as many synonyms as you need. When you are done, click the
Savebutton to retain your changes.
Toggle between languages using the arrows on the language tab to add entity examples for each relevant language.
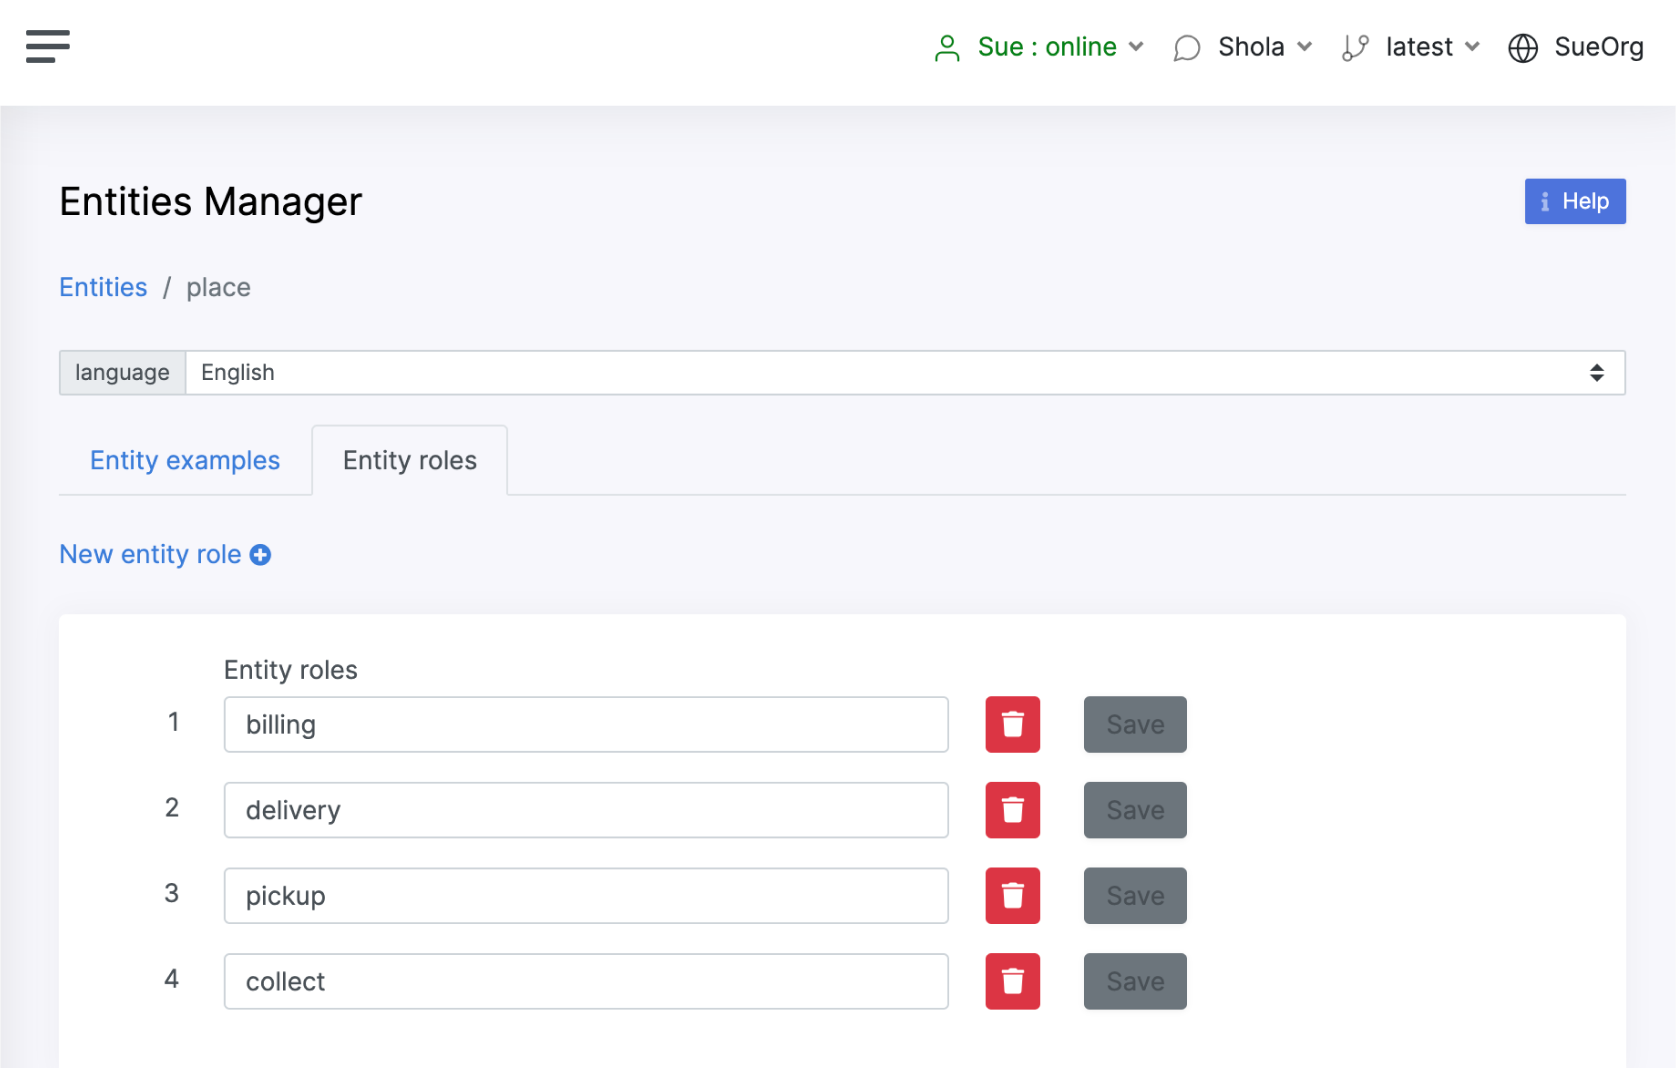
Entity roles are classifications added to an entity to help your bot with disambiguation. Consider the entity "place" in an ecommerce chatbot. Here the chatbot may need to differentiate between the **"place" **for delivery, billing, or collection. Adding these roles (delivery, billing, collection) to the entity allows the bot to appropriately classify the information it receives in the forms it sends out.
-
To add an entity role, ensure the Entity roles tab is selected and click the
New entity rolebutton. -
A pop-up window appears, prompting you to enter a role for your entity.
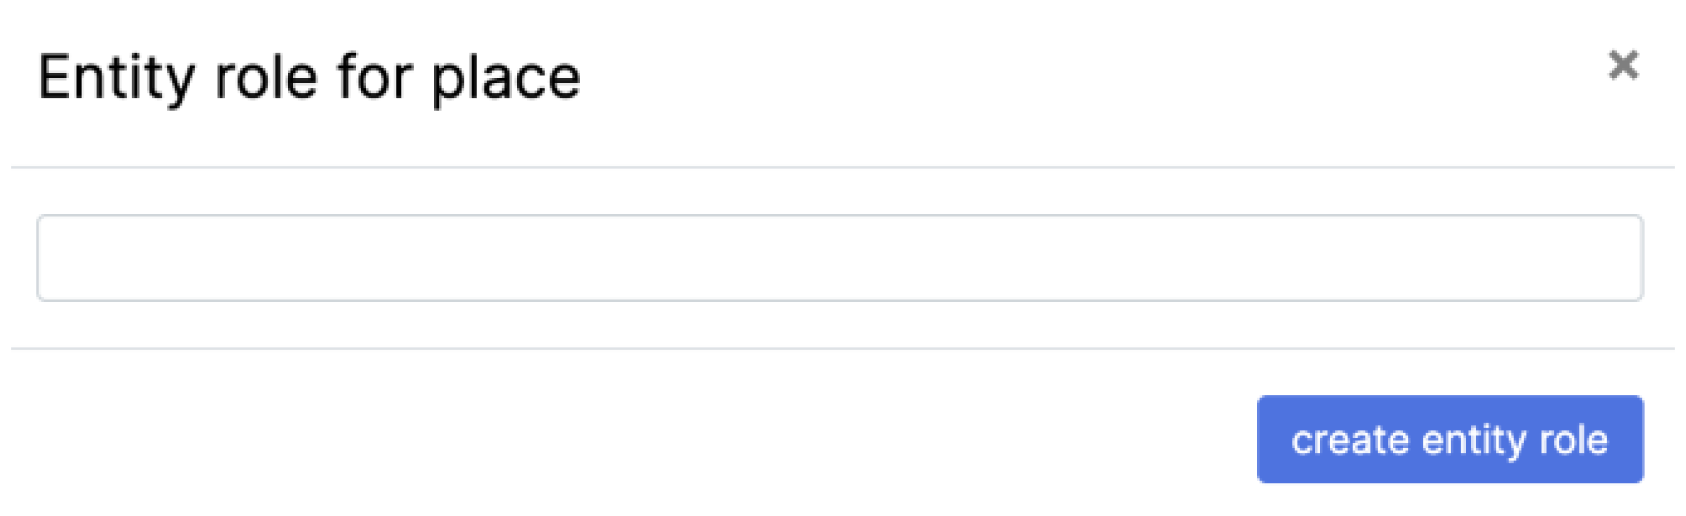
-
Fill in the required information and click
Create entity role. Repeat the process again to add as many roles as needed. -
Your entity roles are created and they appear in a list on the
Entity rolestab.
You have the option of using a pre-trained entity instead of a custom one. Pre-trained variables do not require examples and the available ones can be selected from a dropdown list. The list of pre-trained variables is as follows:
- Time
- Duration
- Distance
- Phone number
- Volume
- Url
- Temperature
- Quantity
- Number
Tag Entities
The Intent Manager allows you to tag entities to your example intent messages.
To tag an entity, use the following steps.
-
From the Intents Manager page, find the intent which you want to tag.
-
Highlight that intent using your cursor.
-
A pop-up window appears, prompting you to assign an entity to the intent as seen in the following image.
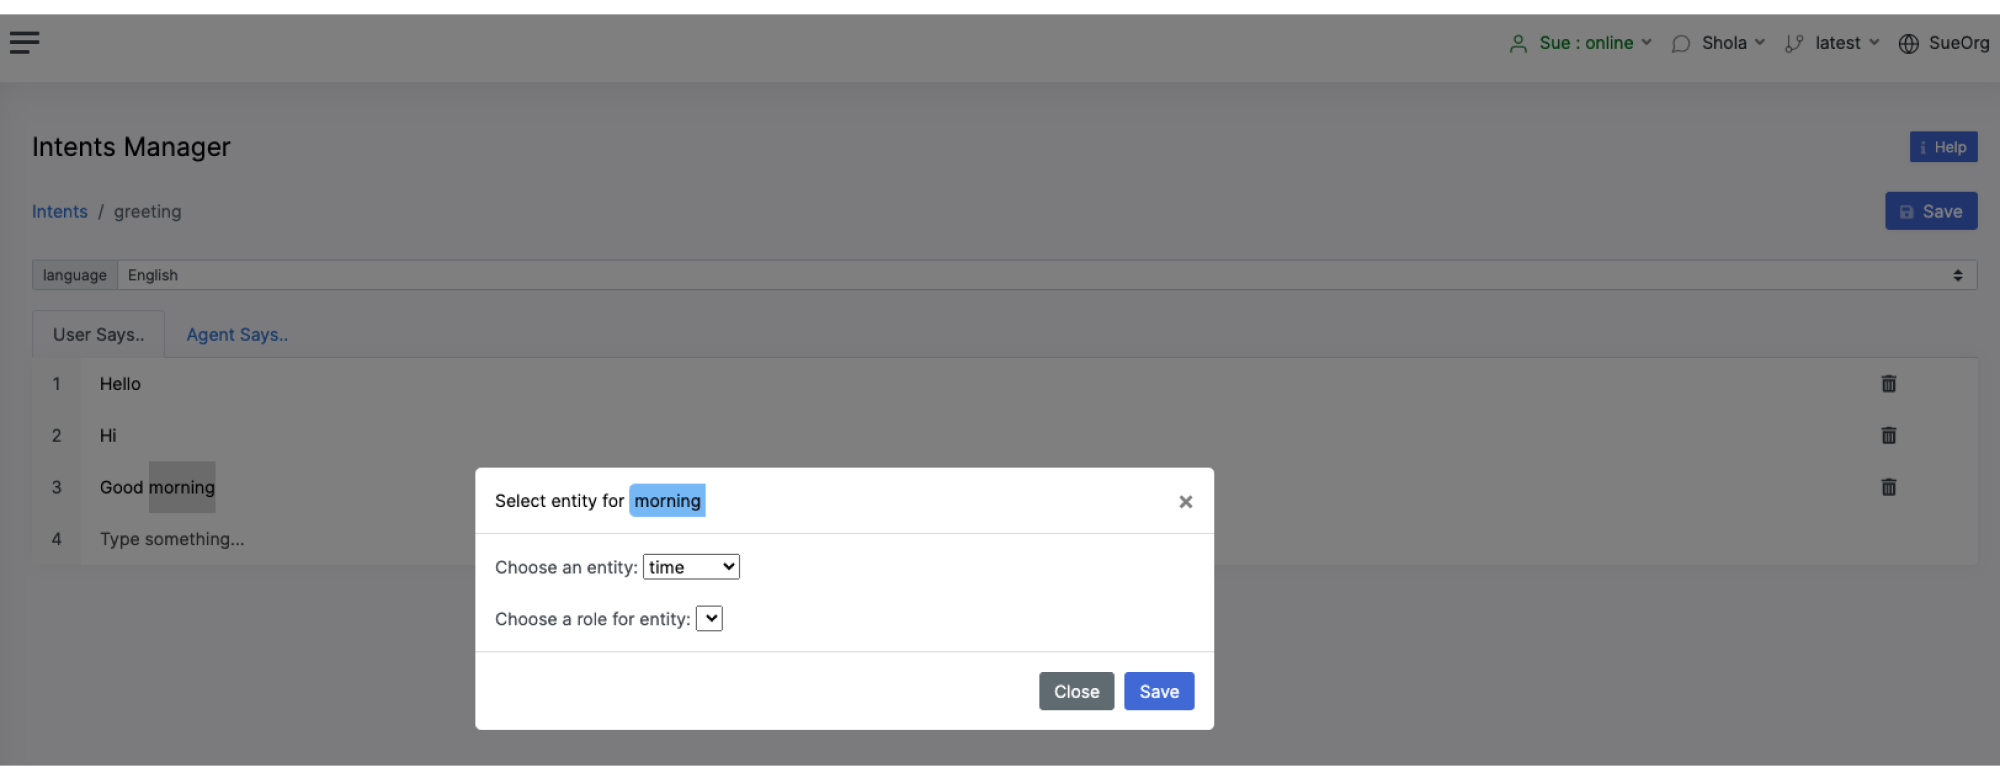
-
Select the appropriate entity for your intent, and assign it a role, if necessary.
-
Click
Saveto retain your changes.
For detailed information on Intents, see the Intents section of the Botlhale AI NLP Toolkit Documentation.
Delete Entities
Use the following steps to delete an entity.
- On the Entities Manager page, locate the entity you wish to delete.
- Click the
Deleteicon that corresponds to the entity you wish to delete. - A pop-up window appears prompting you to confirm this action. Click the
Delete Entitybutton to finalise the deletion.
Deleting an entity also deletes any example values associated with that entity. Deleted content cannot be restored.
Create FAQs
With Bua, you can create a collection of questions, complete with answers, that are commonly asked about your product or service. These are a useful way of improving the customer's experience and reducing support tickets.
On Bua, these FAQs work similarly to intents in that the chatbot categorises messages to a particular FAQ and returns the response associated with the selected question.
Use the following steps to create one or more FAQs for your chatbot.
-
From the FAQs Manager page of the platform, click the
+New FAQbutton. -
A pop-up window appears, prompting you to assign a name to your new FAQ.
-
Enter your desired name and click
Create FAQ. -
Click on the
Editicon next to your newly created FAQ. -
You are taken to a new page. Here, you can begin adding the question and response associated with this FAQ. Note that this must be added in all the languages supported by your chatbot.
-
Repeat these steps for as many FAQs as needed.
You can also create FAQs by uploading an FAQ CSV to the FAQs Manager page
- From the FAQs Manager page, click
Upload FAQs - Specify the language of the FAQs.
- Select the FAQs file you wish to upload. Ensure the file is formatted correctly by referencing the example file.
- Click
Upload. - Your new FAQs are uploaded and appear on the FAQs Manager page.
Once created, these FAQs can be added to your dialogue in the form of button elements via the Dialogue Manager. For more information on this, see the Dialogue Elements section of this documentation.
You also have the option of auto-generating translations for your FAQs. To do so, simply click the Translate button and select your target language. The auto-generated translations appear in the tab corresponding to your target language. This generated translation is fully editable.
Manage Dialogues
The Dialogue Manager is a conversation management interface which allows you to create more complex dialogues with your bot.
These complex dialogues are capable of the following:
- Sending multiple responses following an intent.
- Hitting APIs which return plain-text responses to the end user.
- Using buttons as quick responses.
- Collecting information from the user.
- Generating rich responses in the form of images, PDFs, Word documents, and so on.
The rich response generation capabilities of the Dialogue Manager interface need to be configured to work. This configuration happens on the Custom Functions page. See the Custom Functions section of this documentation for additional information.
The Dialogue Manager interface gives you the option of creating both story-based and rule-based dialogues. Story-based dialogues allow builders to create flexible journeys which are dependent on the user's intents and responses. Rule-based dialogues allows builders to create journeys that follow a fixed path. No other journey can be triggered by the same intent that triggers the rule.
These dialogues can either be custom or preset. Preset dialogues are pre-built conversation starters for common situations. They're easy to use but offer limited flexibility. Think of them like convenient pre-made meals. Custom dialogues let you build conversations from scratch, tailoring them to your specific needs. They require more effort but offer full control over the flow and content. Imagine them as cooking your own meal - more work, but you get exactly what you want.
Together, these dialogues outline a sequence for your bot to follow during a conversation. The flow of the conversation sequence is determined by the intent put forward by the end user. Consider the example of an ecommerce bot presented with a greeting intent where the end user sends a message saying "Hello". This greeting intent could be configured to trigger a Bot button response where the ecommerce bot responds with a greeting and a series of buttons prompting the end user to select a product for purchase.
Create Dialogues
Use the following steps to create a story-based dialogue for your chatbot.
- On the Dialogue Manager, click
New dialogue. - A pop-up window appears, prompting you to name your dialogue and assign it a type.
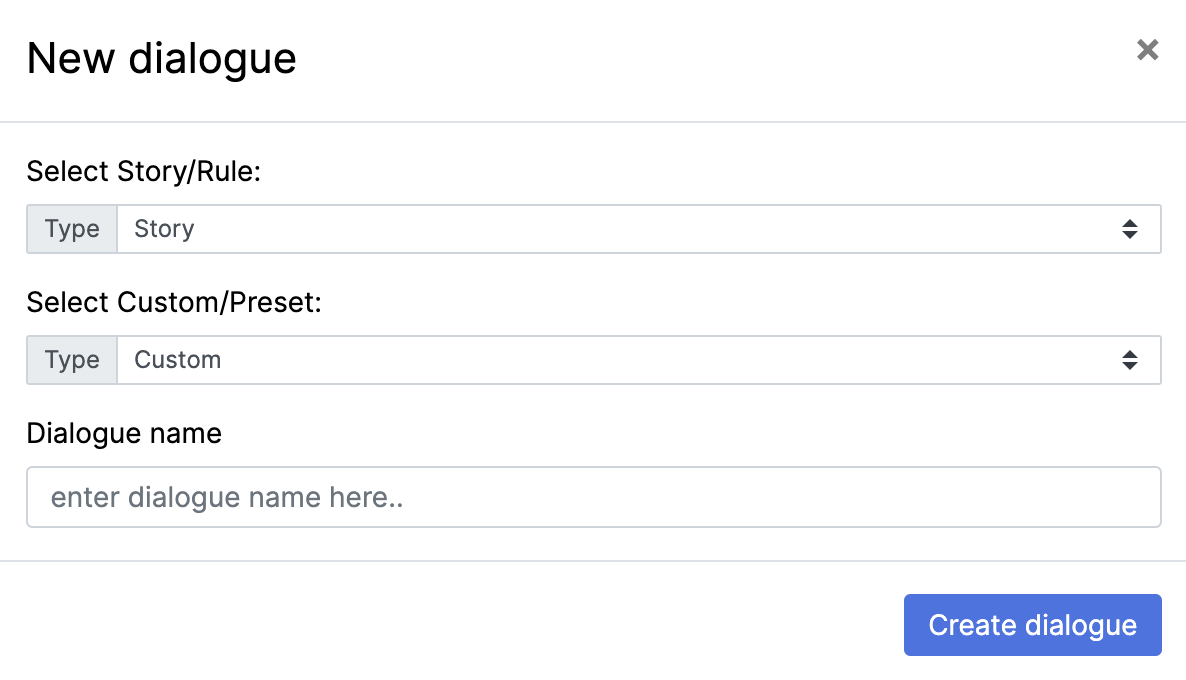
- Specify whether this will be a story- or rule-based dialogue.
- Specify whether this will be a custom or preset dialogue.
- If you selected preset, specify which of the preset dialogues you wish to create.
- If you selected custom, assign a name to your dialogue.
- Click
Create Dialogue. - Depending on the type selected, your newly created dialogue appears on either the Story or the Rules tab.
Now, you can begin building the conversation sequence for your dialogue by creating and adding dialogue elements. This is discussed in detail in the section that follows.
Create Dialogue Elements
As mentioned in the previous section, dialogues outline a script for your chatbot to follow during a conversation. The flow of the conversation sequence is determined by the intent put forward by the end user. Dialogue elements constitute the building blocks for the continuation of this conversation flow. Dialogue elements allow for multiple response types following an intent. These element types include bot text responses, actions, and buttons.
Bot Response
A bot response is the free-form text response that the bot returns during the dialogue. With this element type, you have the option of creating a new response or using an existing one. In addition to this, you have the option of using the response examples from an existing intent to create this type of dialogue element.
- From the Dialogue Manager page, create a new custom dialogue. See the Dialogue Manager section of this documentation for information on how to go about this.
- Click the
Editicon that corresponds to your newly created custom dialogue. - You are taken to a new page, illustrated in the image that follows.
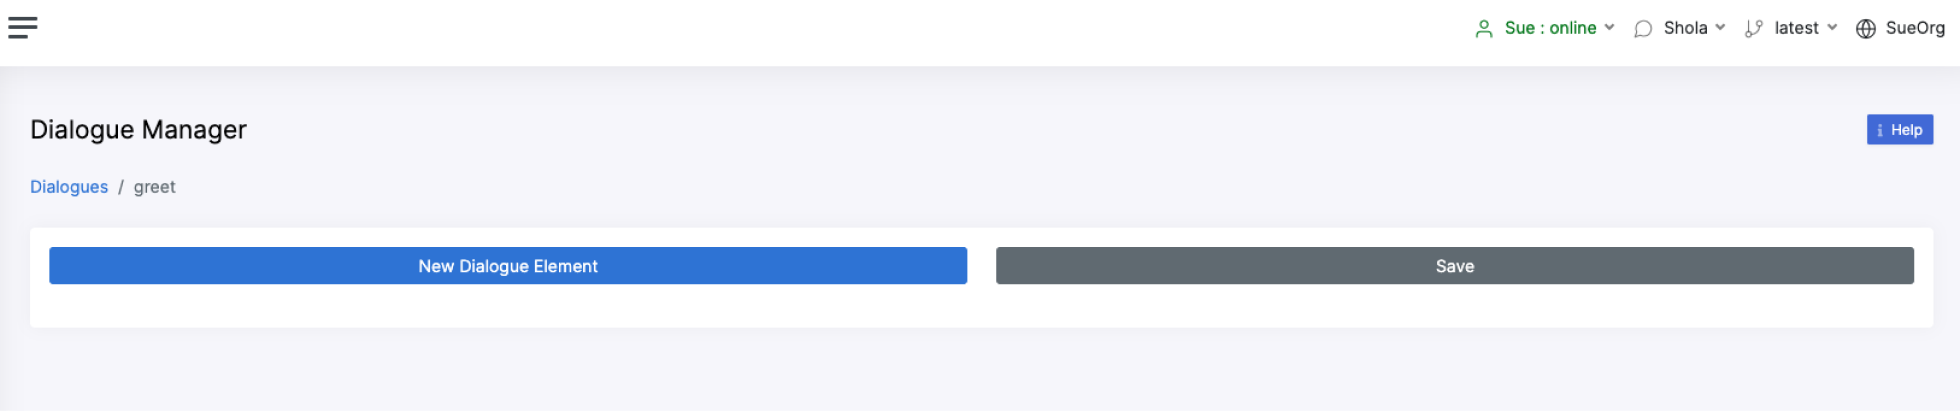
-
Click the
New dialogue elementbutton. -
A pop-up window, illustrated in the image that follows, appears, prompting you to choose a name and type for your new element.
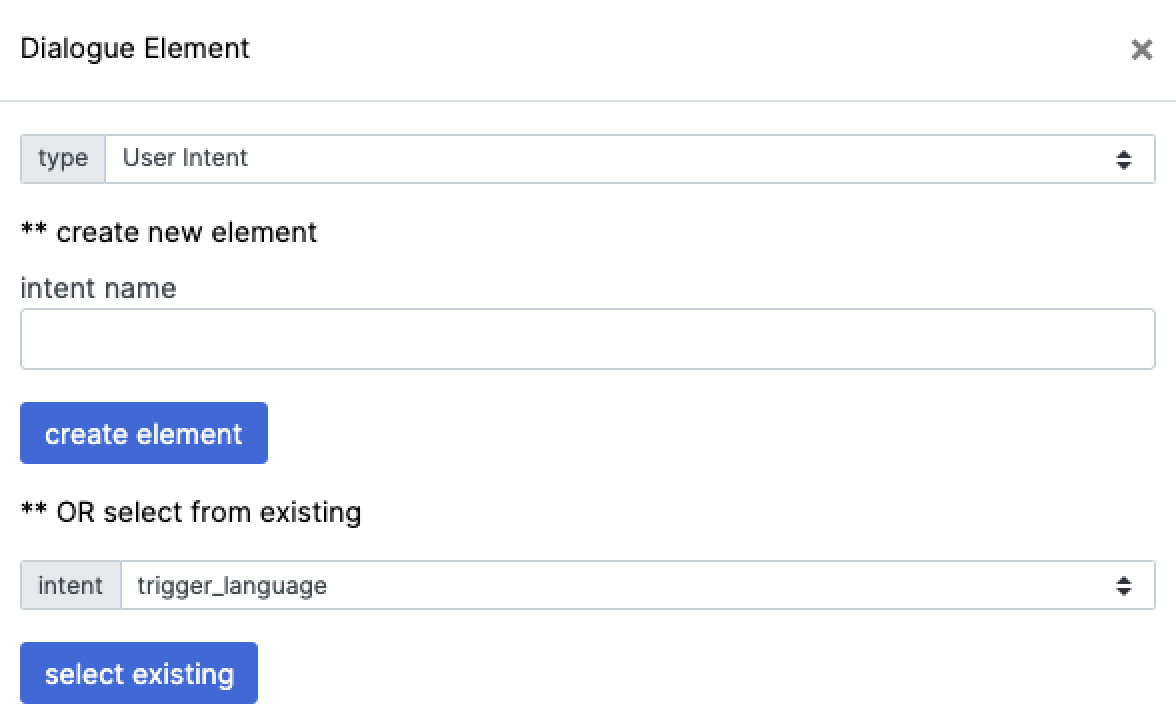
-
All dialogues must begin with an intent. So, first set the type to User Intent and either create a new intent element or select an existing intent from the drop-down menu.
-
Click either the
Create elementor theSelect existingbutton based on the field you filled. -
Your Bot Response element is created and appears on the page. Click
Saveto retain your changes. -
Repeat steps 4 and 5.
-
Set the element type to Bot Response. Once again, either create a new element or select an existing one from the dropdown.
-
Click either the
Create elementor theSelect existingbutton based on the field you filled. -
Your Bot Response element is created and appears on the page. Click
Saveto retain your changes. -
You can now begin adding examples to your dialogue elements. Click the
Add examplesbutton that corresponds to the element you wish to add examples to. -
A new page, illustrated in the image that follows, is shown, prompting you to add examples for your intent.
- Add as many examples as needed and click
Save
Element examples must be added in all the languages supported by your bot. Use the language tab to toggle between your supported languages when adding examples.
Bot Action
Bot actions allow your chatbot to perform certain operations during the dialogue. The bot actions available on our platform are form actions, custom actions, and preset actions.
Form Actions
Form actions collect information (variables) from the user.
To add a form action to your dialogue:
-
From the Dialogue Manager page, click the
Editicon corresponding to the dialogue to which you wish to add a form action. -
Click
New dialogue element -
In the pop-up window that appears, ensure the element type is set to Bot Action and the action type is set to Form.
-
Either enter a name for your new form action or select an existing form action from the drop-down menu.
-
Click either the
Create elementor theSelect existingbutton based on the field you filled. -
Your Form action element is created and listed on the page. Click
Saveto retain your changes. -
You can now begin adding entities to your new form action element. Click the
Add Entitybutton to do this. -
A pop-up window, illustrated in the image that follows, appears, prompting you to name and configure the new entity.

- Fill in the requested information and click
Save
The following description list defines the fields found in the Add entity pop-up window.
Form item name
This is the name you wish to give your form item.
Entity type
This is a dropdown field which allows you to select the type of entity you give your form item. The two entity types available for selection are as follows:
-
from_text: If this option is selected, the chatbot extracts the user's response to the form action via free-form text. In the event your chatbot has ASR capabilities, the user input is extracted from a transcript of the voicenote.
-
from_entity: If this option is selected, you can select the entity you wish to associate with the response to this form action sent by the end user.
Entity
This field is only visible when the selected entity type is "from_entity". This is a dropdown field from which you can select the entity you wish to associate with the user response.
Form item request question
This is the message sent by the chatbot to obtain the information needed from your bot form action. The text in this field must be entered in all the languages supported by your chatbot.
Present as button
This field is only visible when the selected entity type is "from_entity". Selecting this checkbox allows you to add buttons to the form request question. The buttons visible to the end user are obtained from the entity examples you set for the selected entities. See the Entities section of this documentation for more information about entity examples.
Attach role to entity
This field is only visible when the selected entity type is "from_entity". Selecting this checkbox allows you to attach a role to your selected entity for disambiguation purposes. See the Entities section of this documentation for more information about entity roles.
Custom Actions
Custom actions can hit external APIs. Once a custom action has been created, clicking on a language allows you to send a POST or GET request to a webhook endpoint for that language. You also have the option of sending the information collected from forms as part of your payload. At the moment, API responses are limited to plain text only.
Use the following steps to create a custom action.
-
From the Dialogue Manager page, click the
Editicon that corresponds to the dialogue to which you wish to add this custom bot action element. -
Click
New dialogue element -
Ensure the element type is set to Bot Action and the action is set to Custom.
-
You have the option of naming and creating a
new custom action element, orselecting an existingone from the dropdown. -
Click either the
Create elementor theSelect existingbutton based on the field you filled. -
The element is created and is listed in the Dialogue Manager window.
Preset Actions
Preset actions are preconfigured bot actions which allow your bot to perform certain operations. At present, there are four preset actions available to you on the platform. These are described in the following list.
Human handoff
This preset action triggers a human handoff sequence of the end user to a live agent. To add this element to a dialogue, simply create a preset human handoff dialogue. See the Dialogue Manager section of this documentation for more information on preset dialogues.
Check contact list
This preset action checks if an end user's information is available in the Contact List prior to handoff. If the user's contact information is not found, your chatbot obtains this information prior to executing a handoff. To add this element to a dialogue, simply create a preset human handoff dialogue. See the Dialogue Manager section of this documentation for more information on preset dialogues.
Change language
This preset action allows your end user to switch between languages during a conversation with the chatbot. To add this element to a dialogue, simply create a preset change language dialogue. See the Dialogue Manager section of this documentation for more information on preset dialogues.
Reset all form items
This preset action clears all the information collected by your chatbot from forms. It is recommended that you add this action to the end of all dialogues that include forms. If this is not done, the forms will retain all previously collected information if the dialogue is triggered again. To add this preset bot action dialogue element:
-
From the Dialogue Manager page, click the
Editicon that corresponds to the dialogue to which you wish to add this reset element. -
Click
New dialogue element -
Ensure the element type is set to Bot Action and the action is set to Preset.
-
In the preset dropdown field, select the reset_all_form_items option.
-
Click the
Select existingbutton. -
The element is created and is listed in the Dialogue Manager window.
This reset element will only clear the information from form elements that precede it in placement in the dialogue. As such, it's recommended that you place the reset_all_form_items dialogue element after all the form elements in your dialogue. Simply drag and drop the element to change its position in the dialogue.
Reset Action
This bot action element clears the information collected from specific forms. This is useful if you have several form elements in a dialogue but only need the information cleared from certain forms. To add this bot action element to your dialogue:
-
From the Dialogue Manager page, click the
Editicon that corresponds to the dialogue to which you wish to add this reset element. -
Click
New dialogue element -
Ensure the element type is set to Bot Action and the action is set to Reset.
-
You have the option of naming and creating a new reset element, or selecting an existing one from the dropdown
-
Click either the
Create elementor theSelect existingbutton based on the field you filled. -
The element is created and is listed in the Dialogue Manager window.
-
You can now begin adding entities to your new element by clicking on the
Add Elementbutton.
The entities added here need to match the entities associated with the form action you would like to clear.
Bot Buttons (Menu)
The bot buttons or menu element allows you to add a menu functionality to your chat that gives your users the option of using buttons rather than free-form text.
Use the following steps to add this element to your dialogue.
-
From the Dialogue Manager page, click the
Editicon that corresponds to the dialogue to which you wish to add this menu element. -
Click
New dialogue element -
A pop-window, illustrated in the following image, appears, prompting you to fill in the required fields.
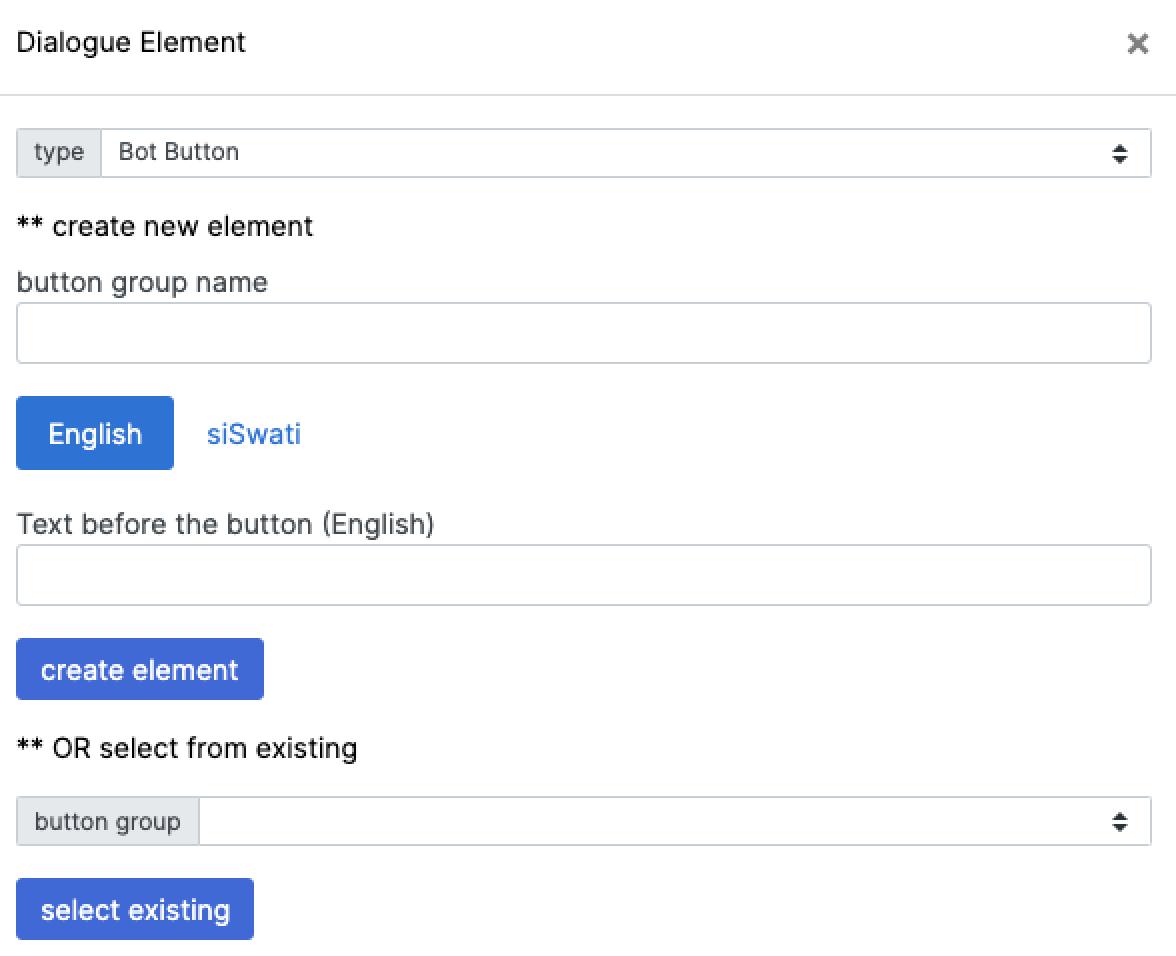
-
Ensure the element type is set to Bot Button.
-
Enter the button group name. This is the collective name you wish to assign to the buttons in this new element.
-
Enter the text you want displayed before the buttons. This text must be entered in all the languages your chatbot supports.
-
Click
Create element -
Your new button element is created and listed in your dialogue.
-
You can now begin adding the individual buttons (options) for your new menu element. Click
Addbutton to do this. -
A pop-window, illustrated in the following image, appears, prompting you to fill in the required fields.
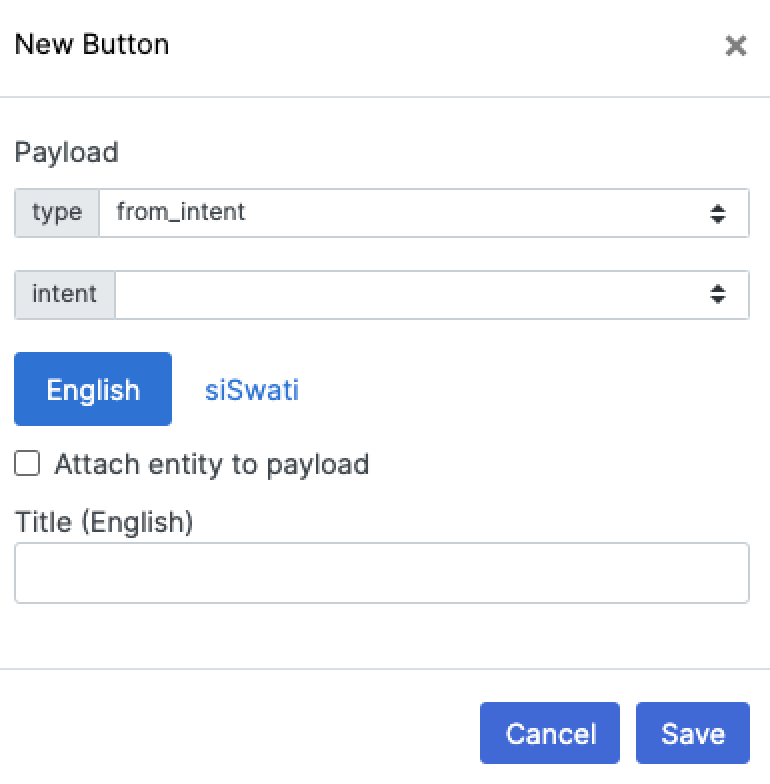
-
Select the payload type from the drop-down menu.
a. Selecting from_intent as the payload type prompts you to select the intent your button should be linked to.
b. Selecting from_faq as the payload type prompts you to select the frequently asked question your button should be linked to. See the FAQ section of this documentation for more information.
-
You have the option of attaching an entity to your button. To do so, select the
Attach entity to payloadcheckbox and choose the entity you would like to attach from the dropdown. -
Enter the title for your new button in the field provided. This is the text that should be displayed on the button. This text needs to be entered in all the languages your chatbot supports.
-
Click
Save. Your new button is now added.
Example
The following example shows how these dialogue elements can be used together.
-
A user sends text to the bot. This text is classified as a flight_search intent.
-
The bot then requests two information items from the user: departure_city and arrival_city.
-
The user responds with the requested information.
-
The bot then uses an action to hit an API and send the collected information in the API request. The response from the API is in plain text and displayed to the user.
-
A feedback question is also displayed to the user, along with two buttons that the user can click.
Enable Custom Functions
Botlhale AI's platform allows for a range of custom functions that can be used to tailor and personalise the way your chatbot interacts with the end user. These custom functions are either predefined or customisable. Integrating custom functions on the platform allows you to integrate with third parties, hit endpoints on a server, process specific documents, and much more. These functions not only streamline and enhance the user's experience, but also provide you with invaluable insights and increased efficiency.
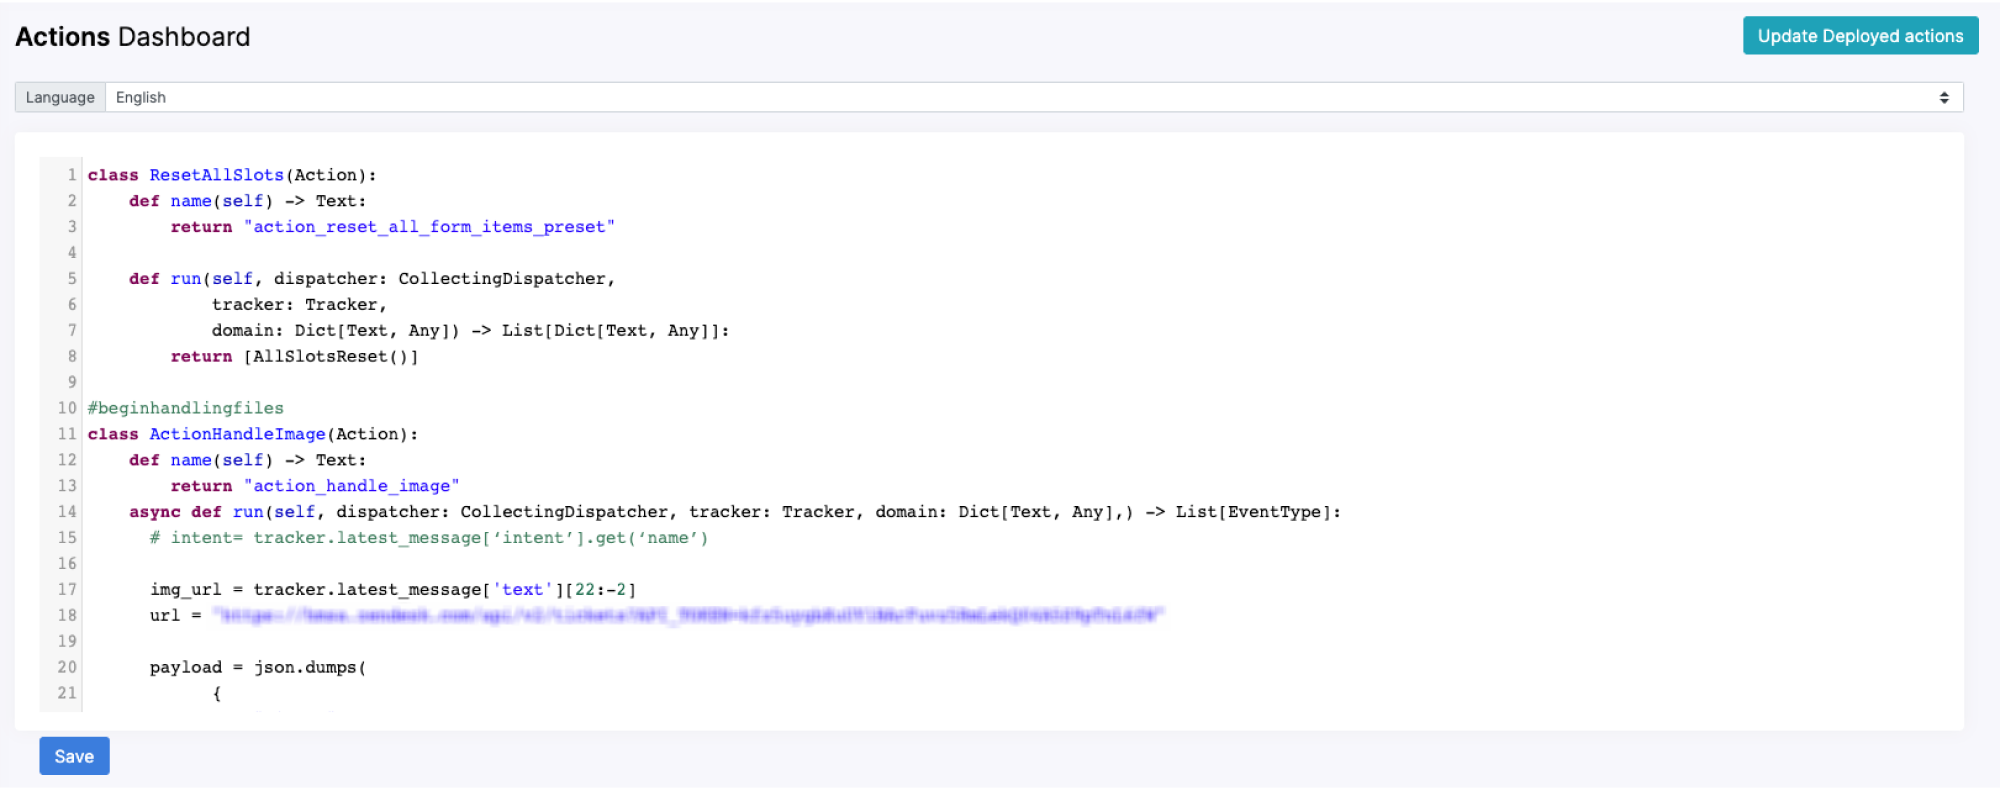
Custom functions are configurable and visible on the Actions Dashboard page of Botlhale's NLP Toolkit platform. The following image shows a code snippet of a custom action that allows your chatbot to process images.
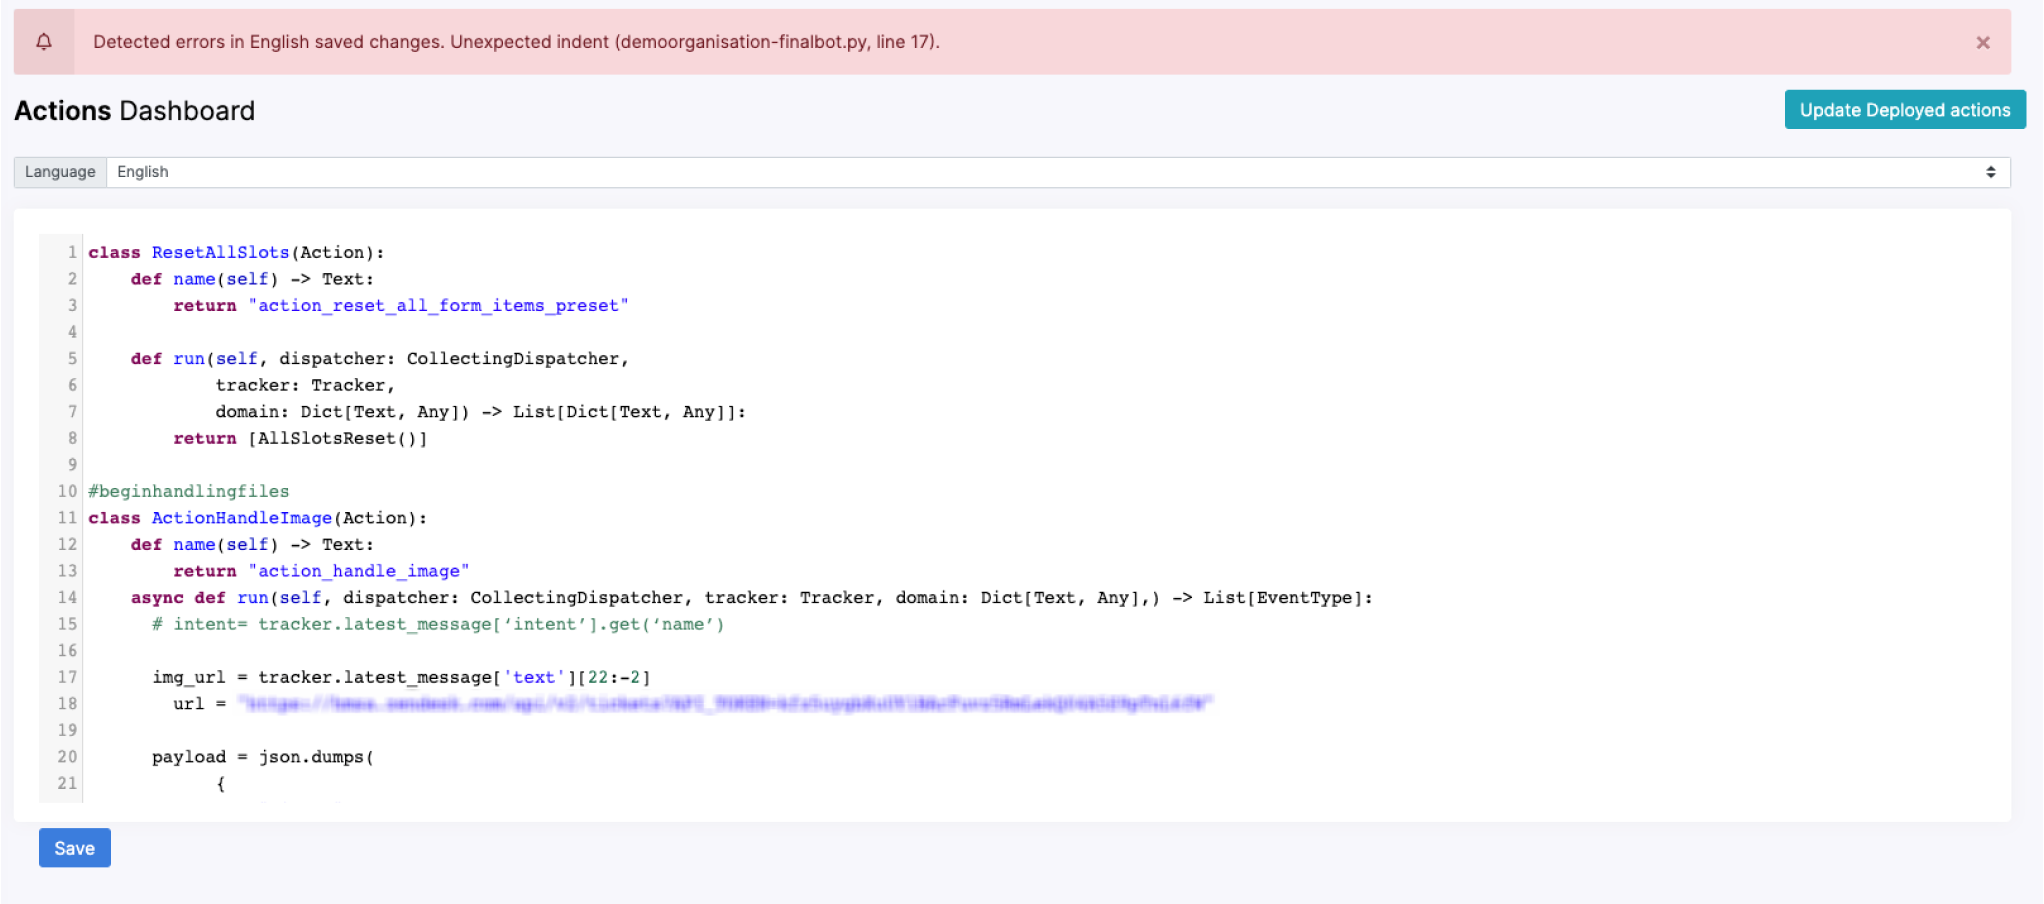
The Actions Dashboard also flags any errors in your code, highlighting the erroneous code. You are able to resolve these errors within the Actions Dashboard window. The following screenshots illustrate this.

Adding preset or custom bot actions to your dialogue via Dialogue Manager automatically will override any previous related configuration done in the Actions Dashboard. See the section on Bot Action for more information.
Use the actions dashboard to control who interacts with your chatbot and what features they can access. This allows for a targeted deployment. You can limit the bot to a select group of users, essentially creating a testing pool. This way, you can refine new features with a smaller audience before rolling them out to everyone.
Human Handoff Integration
The Botlhale NLP Toolkit has a predefined dialogue that can be selected to enable the human handoff feature. See the Dialogue Manager section of this documentation for information on how to enable this preset dialogue. The human handoff dialogue contains the following two dialogue streams:
- provide_handoff_options
- execute_handoff
These two dialogues work off the shell and do not require any modifications.
The human handoff capability uses Socket.IO, a library that allows message passing between a server and multiple clients. All chatbots with human handoff set up need to connect to Botlhale AI's Socket.IO server.
The following code snippets can be used to set up socket IO, as well as event listener and emitter functions to interface with Botlhale AI's Socket.IO server. The code snippets use JavaScript. However, if your bot is integrated in a non-JavaScript environment, there are several client implementations available in other languages. See the Socket.IO documentation for additional information.
<script src="https://cdn.socket.io/3.1.3/socket.io.min.js"
integrity="sha384-cPwlPLvBTa3sKAgddT6krw0cJat7egBga3DJepJyrLl4Q9/5WLra3rrnMcyTyOnh" crossorigin="anonymous"></script>

// SOCKET IO initialisation !
const socket = io.connect('https://app.botlhale.io/live_agent', {autoConnect: false});

// first time connecting to the main socket !
socket.on('startConversation', function() {
   socket.emit('username', {
       "ConversationID": ConversationID,
       "BotID": BotID
   });
});

// receiving a message !
socket.on('to_user', function(data) {
   let text = data.message;
   setBotResponse(text);
});

// send messages to clients !
socket.on('messages', function(data) {
   let messages = []
   // populate messages variable with user-bot conversation !
   // each element in the array must have the following format:
   // {'sender': String, 'message': String}
   // if message belongs to the user, then the value of 'sender' must be 'user'
   // if message belongs to the bot, then the value of 'sender' must be 'bot'
   socket.emit('messages_to_client', {
       "messages": messages,
       "bot_id": BotID
   });
});

// disconnecting socket !
socket.on('disconnect_socket', function(data) {
   socket.disconnect();
});

 // Sending a message
if (socket.connected) {
  // Send a message to socket
   socket.emit('from_user', {
       "message": message,
       "ConversationID": ConversationID,
       "BotID": BotID
   });

} else {
  // Send a message bot
}
Test Virtual Assistant
This section outlines the procedures for testing your chatbot once it's been created and trained.
It's recommended that you open the Test page in a new Tab or Window should you want to browse through the app while you test your chatbot. Leaving the Test page while testing is ongoing will require you to reload the model.
You have the option of performing a Quick Test or a Telegram Test for your chatbot. Quick Tests happen within the Botlhale NLP Toolkit platform. With Telegram Tests, you need to have an existing Telegram portal to which to deploy the test. The following subsections outline the procedures for both tests.
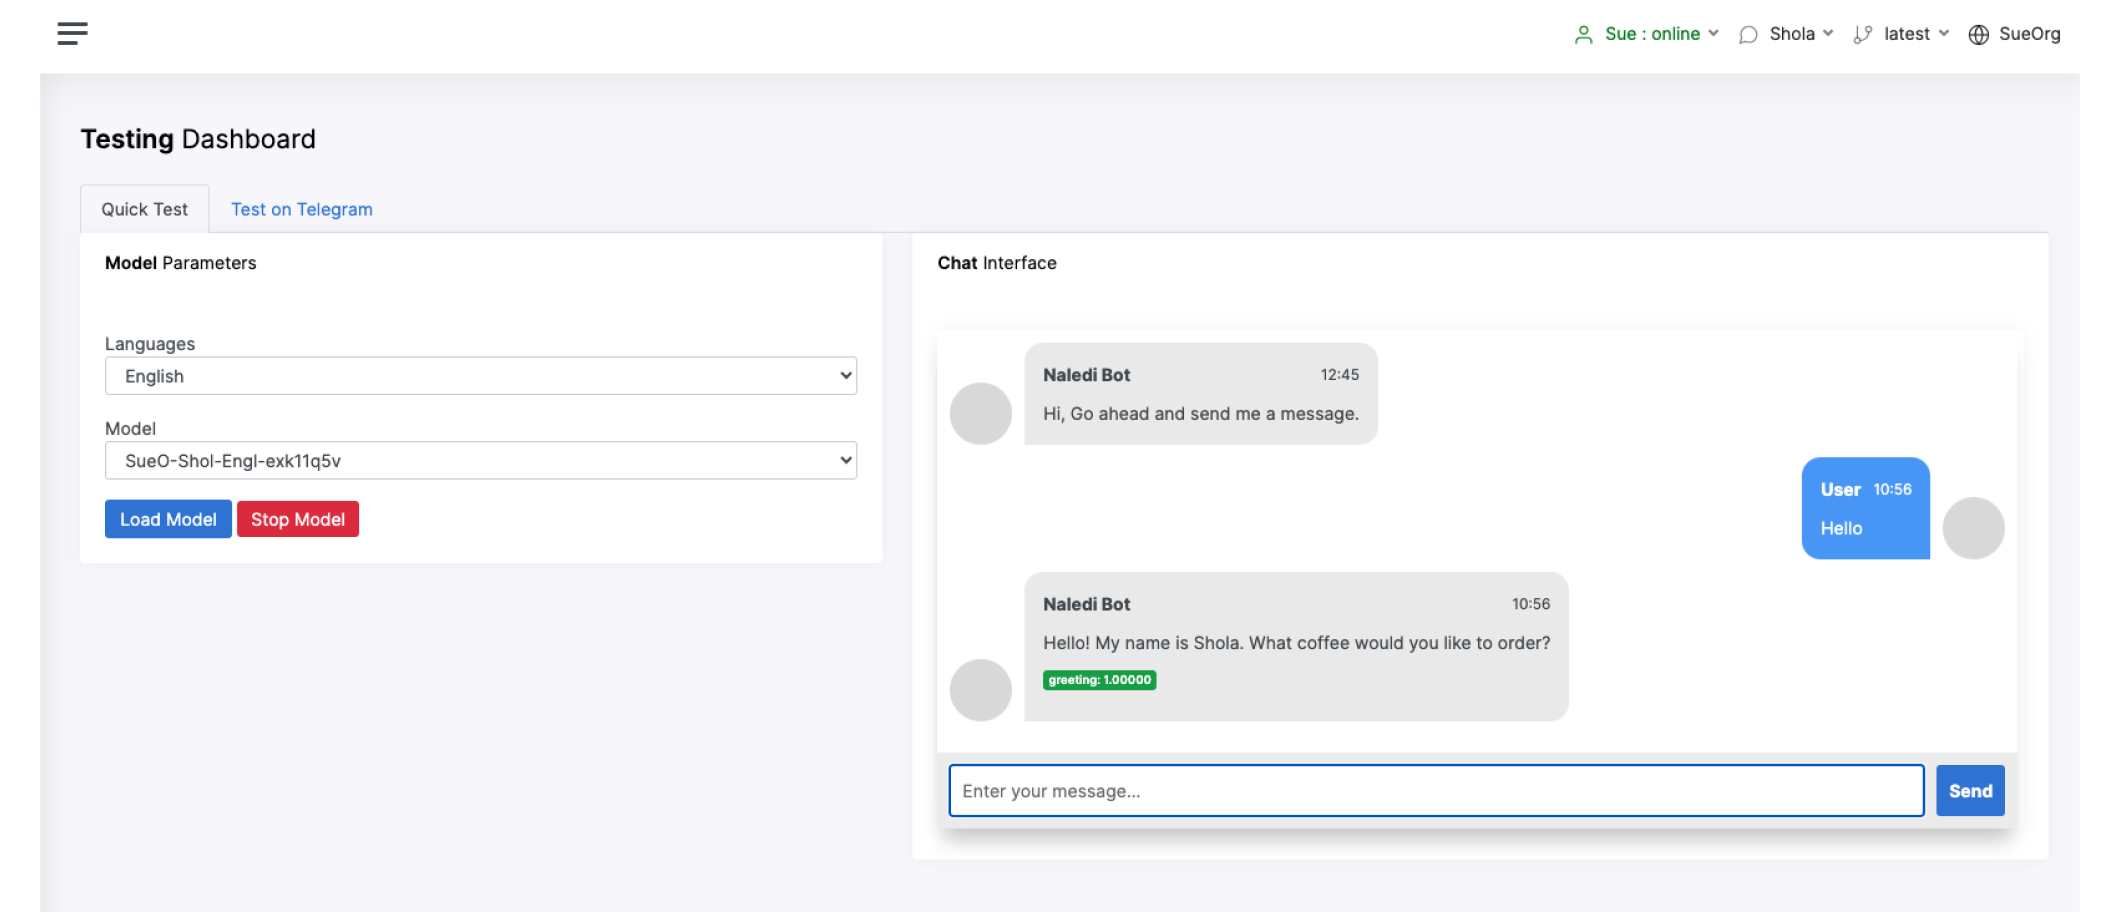
Quick Test
Use the following steps to perform a Quick Test on your chatbot.
-
On the Testing Dashboard, ensure the Quick Test tab is selected.
-
Enter the Model Parameters for your Quick Test. This is the language and model (trained chatbot) you wish to test.
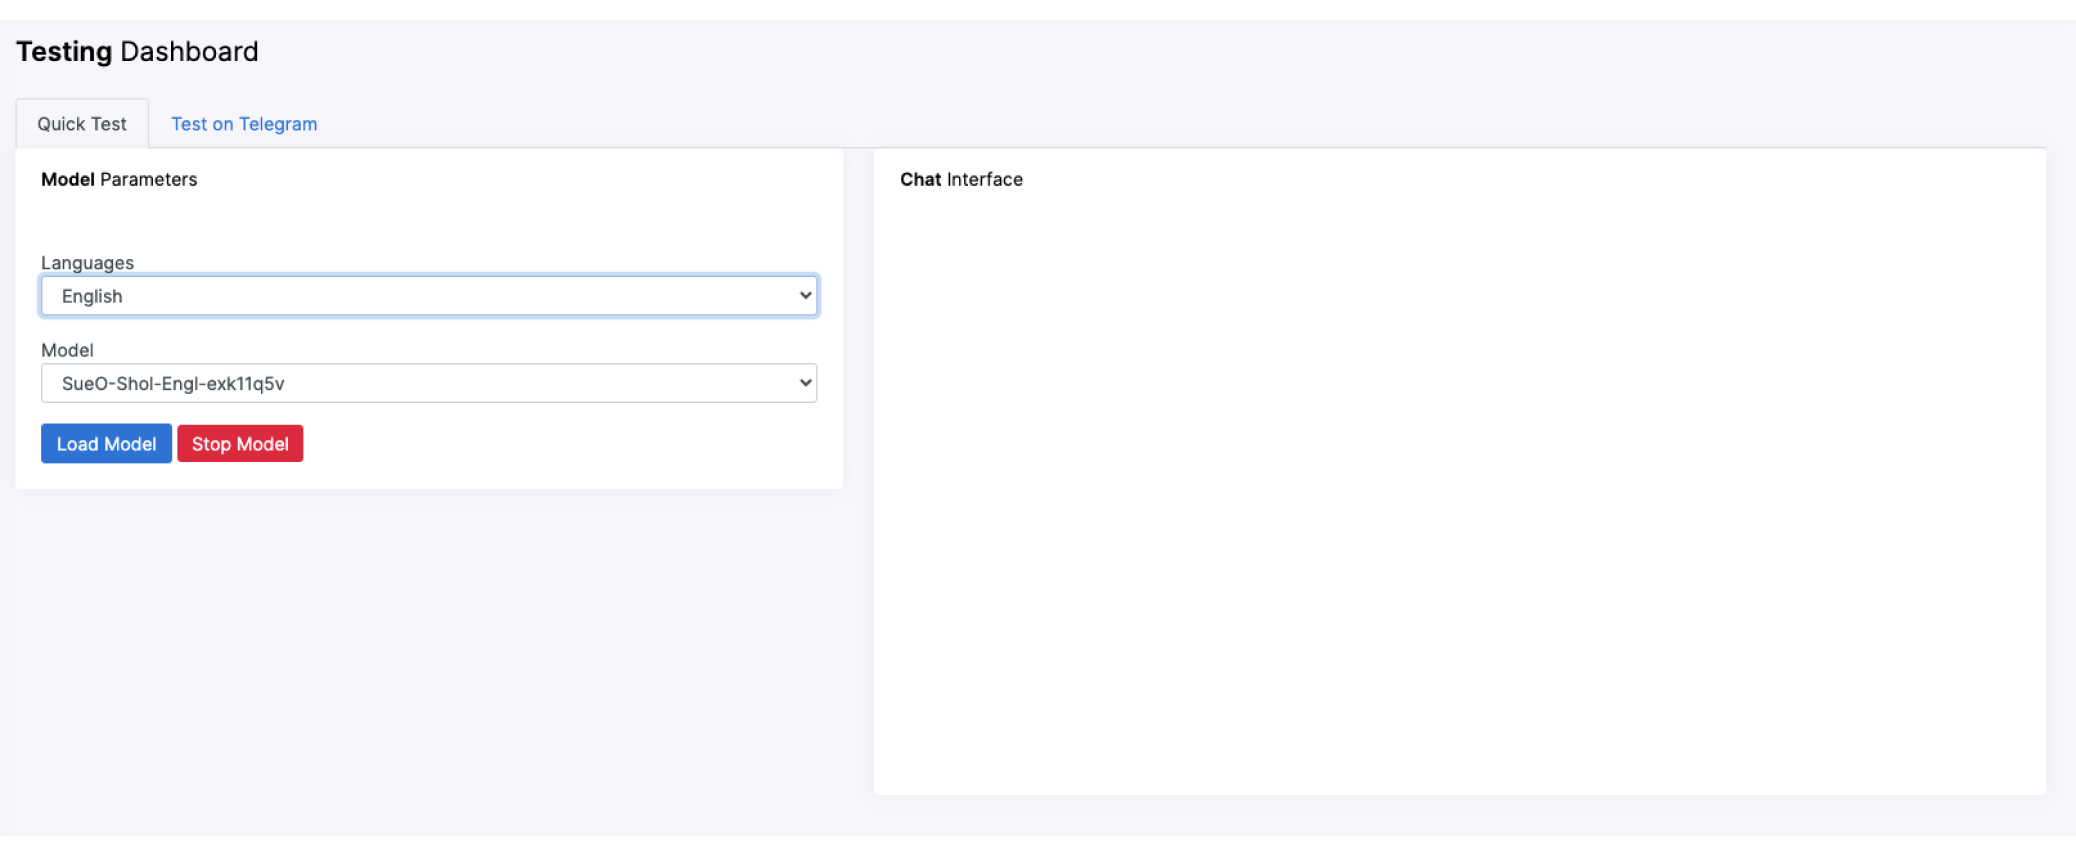
Like with training, you can only test one model and language at a time.
-
Click the
Load Modelbutton. -
Once your model is loaded, a message from your chatbot appears on the Chat Interface, and you can begin interacting with the chatbot.
Telegram Test
You need a valid bot token to test a chatbot on Telegram Click here to learn how to create a bot on telegram.
Use the following steps to test your chatbot on Telegram.
Telegram testing sessions last for 15 minutes.
-
On the Testing Dashboard, ensure the Test on Telegram tab is selected.
-
Enter the Model Parameters and provide a valid Telegram bot token.
-
Click
Connect to Telegram -
A green ribbon appears at the top of the Testing Dashboard page, indicating you can begin testing your bot on Telegram.
-
Click the Send icon to begin a testing instance in a new window.
-
You can now begin testing your chatbot on Telegram.
Train Virtual Assistant
This section outlines the procedure for training a chatbot with the intents and user examples provided in the previous sections. Training is done with a dataset which comprises many sentences organised into intents. This represents what users say to a chatbot. The training dataset teaches the chatbot to understand a user's needs and trigger the right conversation sequence.
Use the following steps to train your chatbot.
- Ensure the chatbot you wish to train is selected. Use the dropdown menu in the top-right corner of the Botlhale NLP Toolkit site to toggle between chatbots.
- Navigate to the Training Dashboard.
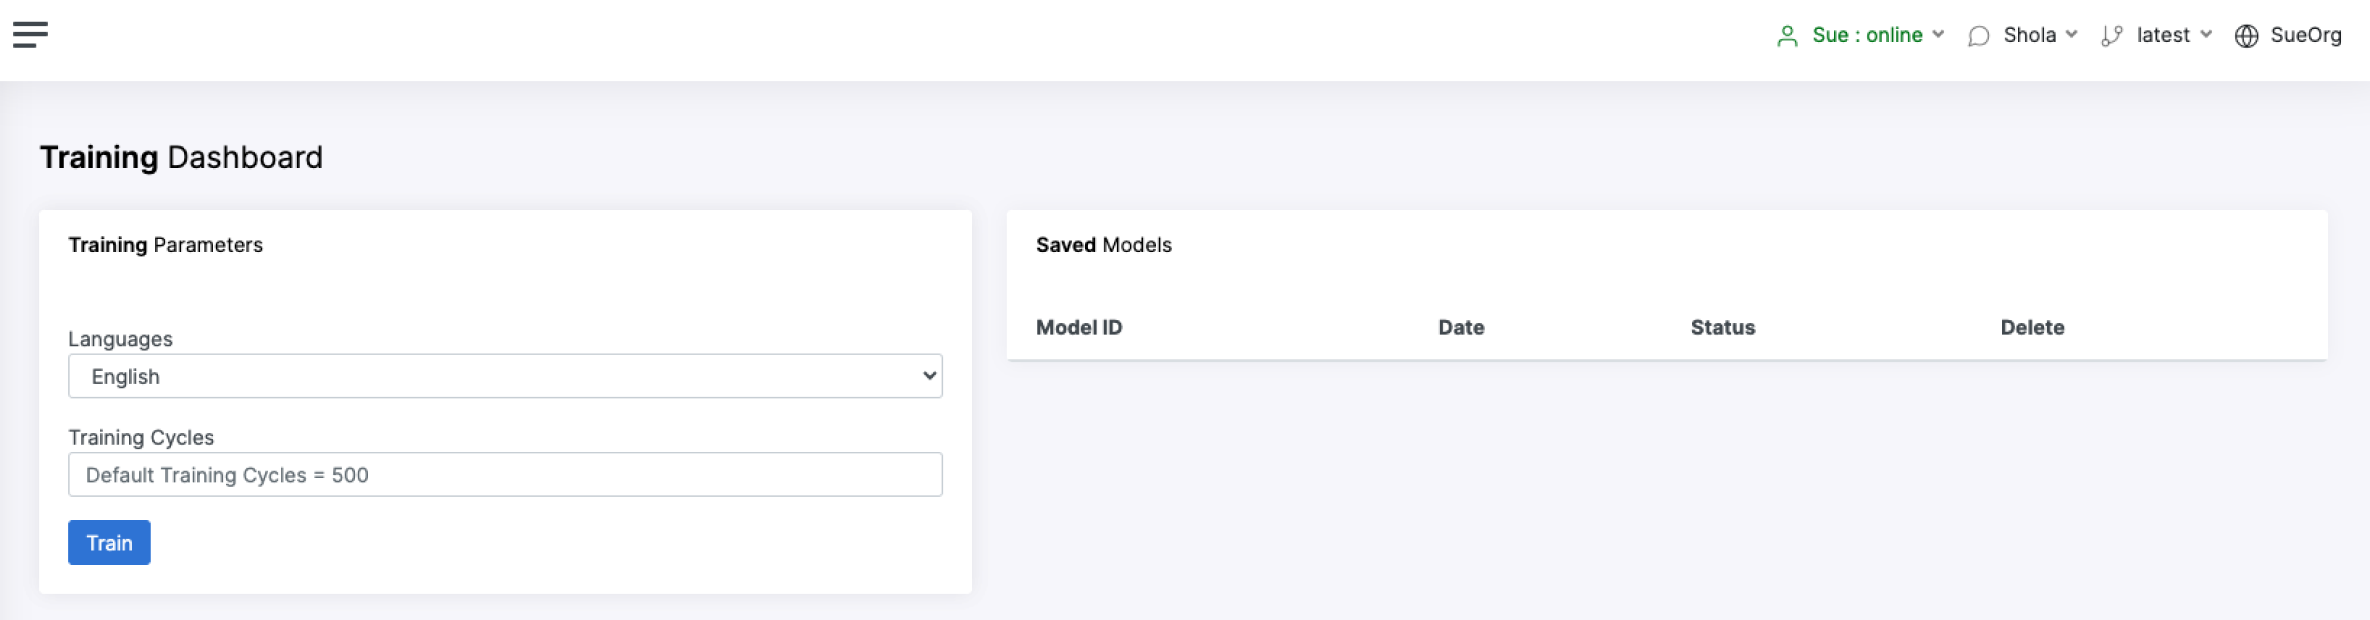
- Select the language you wish to use to train your chatbot.
You can only train your chatbot with one language at a time.
-
Set the Training Cycle parameter. This parameter indicates the number of times you would like to train your chatbot.
-
Click the
Trainbutton. Your chatbot training begins. You can monitor the status of your training in the Saved Models tab.
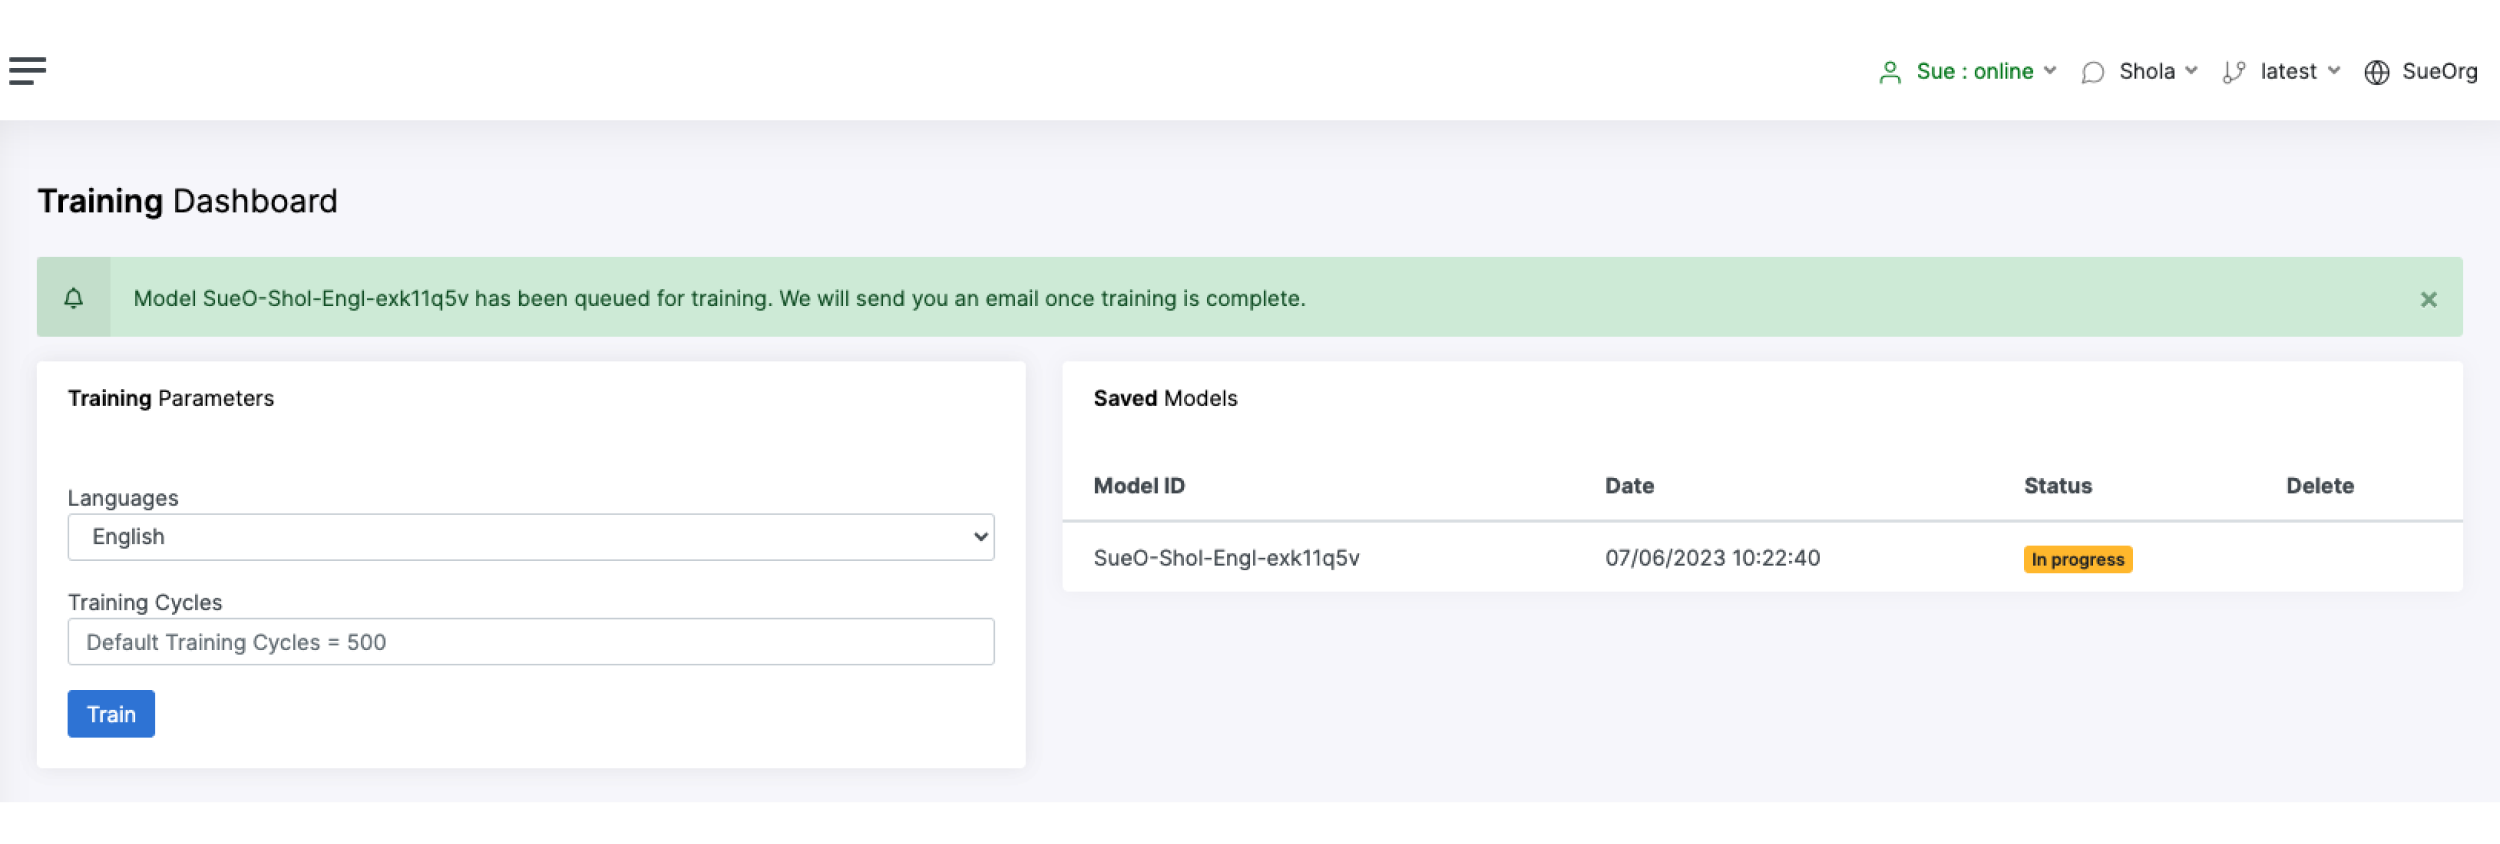
-
Once training is completed, the status changes to "Done". You will also receive an email confirming this.
-
Repeat this process until you have trained your chatbot in all your desired languages.
Version Virtual Assistant
Botlhale's NLP Toolkit platform offers versioning capabilities for your chatbots. This gives you the ability to manage and control different versions or iterations of your chatbot, enabling you to manage the evolution of your bot over time.
You can create a new version of your chatbot from any of the following pages on the platform:
- Intents Manager
- FAQs Manager
- Entities Manager
- Dialogue Manager
To create a new chatbot version:
- From any of the pages previously listed, click the
Save New Versionbutton that features on the top-right corner. - A pop-up window appears, prompting you to name your version.
- Enter your desired version name and click
Create version - Your new chatbot version is created.
You can toggle between different versions of your chatbot by using the dropdown menu in the top-right corner of any page on the platform.
Contact us
We are here to help! Please contact us with any questions.